
 By Team THOR
Free 28-Day Fascia Reset Email Course
Get our Free 28-day email course series to help with 1 or 2 exercises per day to release your fascia. One short lesson per day. Two minutes to read each.
The Complete Gua Sha Routine for Midlife Women: A Step-by-Step Facial and Body Practice (With Videos, Diagrams, and Infographics)
Priya is fifty-one. She has a stone gua sha tool that her daughter gave her for Christmas two years ago. It has moved between the bathroom drawer, the bedside table, and a decorative dish on the dresser, and in that time she has used it perhaps six times, always the same way: three or four random swipes up each cheek while she is thinking about something else entirely, done in under a minute, more habit than practice.
She has watched enough fifteen-second videos to know the tool is supposed to do something. She could not tell you what a technique actually looks like, what order the strokes go in, how much pressure is correct, or why some mornings her face looks brighter afterward and other mornings nothing seems to change at all.
This is not a failure of discipline. It is a failure of information. Somewhere between the ancient practice and the algorithm-optimized fifteen-second clip, the actual routine got lost. What survived was the tool and the vague promise. What disappeared was the sequence, the pressure, the direction, the timing, and the patience that make gua sha work the way it is supposed to work.
A real gua sha routine is not random swiping. It is a specific, ordered, technique-driven practice that follows the architecture of your own face and body, moves lymph in the direction it actually drains, and produces results that compound over weeks rather than evaporating by lunchtime. This article gives you that actual routine. Not the fifteen-second version. The whole thing, in order, with the diagrams and the videos that should have come with the tool in the first place.
Why Most Gua Sha Routines Fail Before They Start?
The single biggest reason gua sha does not work for most people who own a tool is that nobody taught them a routine. They were taught a tool exists and a vague promise attaches to it. This produces exactly what happened to Priya: random motion without direction, pressure, sequence, or consistency.
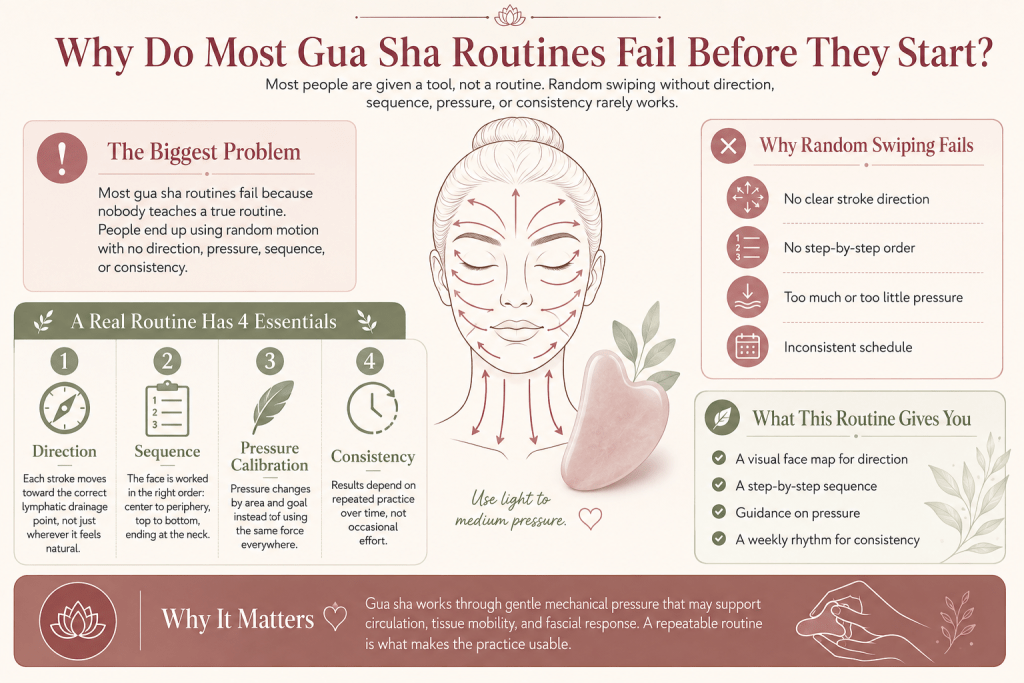
A routine has four properties that random swiping does not. It has direction, meaning every stroke moves toward the correct lymphatic drainage point rather than in whatever direction feels natural in the moment. It has sequence, meaning the face is worked in a specific order that respects how lymph actually flows out of the tissue, from center to periphery, from top to bottom, ending at the neck.
It has pressure calibration, meaning the amount of force changes depending on the area and the goal, rather than applying the same pressure everywhere. And it has consistency, meaning it happens on a schedule rather than sporadically, because the physiological effects of gua sha, like the physiological effects of exercise, depend on repeated stimulus over time rather than occasional effort.
This article gives you all four. The face map in section three shows you direction. The step-by-step routine in section four gives you sequence. The technique section explains pressure. And the weekly rhythm in section ten gives you the structure for consistency.
The mechanisms behind gua sha and fascial release help explain why the technique can influence circulation, tissue mobility, and the way fascia responds to gentle mechanical pressure. With that foundation in place, this article focuses entirely on a complete, repeatable, visual routine you can actually follow.
What Do You Need Before You Begin?
- The Tool: A body gua sha tool is typically 3 to 5 inches long, with straight and curved edges designed for larger areas of the body. Facial tools are smaller and more contoured, with different edges for the cheeks, jaw, brows, under-eyes, and pressure points. Common materials include rose quartz, jade, bian stone, and stainless steel. Material mainly affects temperature and feel rather than effectiveness; any smooth-edged tool can work well.
- The Oil: Facial gua sha requires oil or a slippery serum. Never perform gua sha on dry skin; this causes microtears and irritation rather than benefit. Facial oils that work well include jojoba, rosehip, marula, and squalane. If you prefer a water-based approach, a thick hydrating serum can work, though oil provides the longest glide time.
- The Mirror: A large mirror at a comfortable height. Facial gua sha requires you to see the whole face, not just the section you are working on, so you can track symmetry.
- The Environment: A quiet five to ten minutes. This is not a routine to rush through while checking your phone. The physiological benefits depend partly on the parasympathetic activation that comes from slow, attentive movement.
- A Towel: To manage excess oil and to press against the skin after the routine to remove residue if desired.
Free 28-Day Fascia Reset Email Course
Get our Free 28-day email course series to help with 1 or 2 exercises per day to release your fascia. One short lesson per day. Two minutes to read each.
How Does the Face Map Explain Direction and Lymphatic Flow?
Understanding lymphatic drainage direction is the single most important piece of knowledge for an effective gua sha routine. The lymphatic system does not have a central pump like the cardiovascular system; it relies on muscle movement and external pressure to move fluid toward the lymph nodes, which sit primarily along the sides of the neck, behind the ears, and along the collarbone.
The Basic Rule
Work from center to periphery, and always finish by moving fluid down the neck toward the collarbone (the terminus point where lymph empties into the venous system).
The Four Key Drainage Zones
- Preauricular Nodes (in Front of the Ear): Drainage point for the cheek, temple, and side of the forehead. Most cheek and temple strokes should terminate here.
- Postauricular Nodes (Behind the Ear): Drainage point for the back of the jaw and lower cheek. Jawline strokes moving from chin to ear should curve slightly behind the ear at the end.
- Submandibular Nodes (Under the Jaw): Drainage point for the chin and lower face. Strokes from the chin and lower cheek pass toward this area before continuing down the neck.
- Supraclavicular Nodes (Above the Collarbone): The terminal drainage point for the entire face and neck. Every routine should end with several strokes down the sides of the neck toward the collarbone, opening this final pathway before working the face, and closing with it again at the end.
Why the Neck Comes First
A properly sequenced routine opens the neck lymphatic pathways before working the face. If you work the face first without opening the neck pathway, you push fluid toward a drainage route that is not yet clear, which reduces effectiveness and can occasionally cause puffiness rather than reducing it. This is the single most commonly skipped step in casual gua sha practice and the reason many people see inconsistent results.
How Do You Perform the Complete Facial Gua Sha Routine Step by Step?
This is the full sequence, in order. Total time: 8 to 12 minutes once you know it well; allow 15 minutes while learning.
Step 0: Open the Neck (Always First)
Using the broad edge of your tool at a 15-degree angle, stroke from the base of your ear down the side of your neck to your collarbone. Light to medium pressure. 5 strokes each side. This opens the terminal drainage pathway before you move any fluid toward it from the face.
Step 1: Décolletage Sweep
Using the broad edge, stroke from the center of your chest outward toward each shoulder, then down. 3 strokes each side. Light pressure. This clears the area just below where facial lymph will eventually drain.
Step 2: Jawline, Chin to Ear
Place the notched or curved edge at your chin. Angle the tool at 15 to 30 degrees against the skin. Stroke along the jawline from the center of the chin out to the earlobe, curving slightly upward and behind the ear at the end. 5 strokes each side, alternating sides or completing one side fully before moving to the other.
Step 3: Cheek, Nose to Ear
Place the broad curved edge beside your nose at cheek level. Stroke outward and slightly upward toward the top of the ear, following the natural curve of the cheekbone. 5 strokes each side. Medium pressure; this is one of the more forgiving areas for pressure.
Step 4: Under-Eye, Inner to Outer (Extremely Light Pressure)
This is the most delicate step in the entire routine. Using the smallest, most gently curved edge of the tool, or the narrow notch if your tool has one, place it at the inner corner of the eye just below the bone (not on the eyeball or directly on the thin skin touching the lash line). Glide with feather-light pressure along the orbital bone toward the temple. 3 strokes each side. The pressure here should be lighter than anywhere else on the face; err on the side of too light.
Step 5: Brow Bone, Inner to Outer
Using the notch of the tool, hook it gently under the brow bone at the inner corner near the nose. Glide outward along the bone to the temple. 3 strokes each side. Light to medium pressure.
Step 6: Forehead, Center to Temple
Starting at the center of the forehead just above the brows, stroke outward toward the temple on a slight upward angle. Repeat at three heights: just above the brows, mid-forehead, and near the hairline. 3 strokes at each height, each side. Medium pressure.
Step 7: Temple Circles
Using the flat edge, make small gentle circular motions at each temple for 15 to 20 seconds per side. This is a resting point in the routine and often the most relaxing step.
Step 8: Close the Neck (Always Last)
Repeat Step 0. Five strokes each side from ear to collarbone. This closes the routine the same way it opened, reinforcing the drainage pathway you have been feeding throughout.
Step 9: Final Decompression
Place both palms flat against your face for 10 seconds. Breathe slowly. This is not a gua sha stroke; it is a nervous system cue that the routine is complete, and many practitioners find it meaningfully shifts the felt sense of the practice from task to ritual.
Free 28-Day Fascia Reset Email Course
Get our Free 28-day email course series to help with 1 or 2 exercises per day to release your fascia. One short lesson per day. Two minutes to read each.
How Do You Perform the Neck and Décolletage Routine?
The neck deserves its own extended sequence beyond the opening and closing strokes in the facial routine, particularly for midlife women where neck skin laxity and fascial changes are common concerns.
Extended neck sequence (Add 2 to 3 times per week):
- Vertical Neck Strokes: Using the broad edge, stroke from just under the jaw down to the collarbone, working in vertical lines across the front of the neck. 5 strokes per line, 3 lines (center, left of center, right of center). Light to medium pressure; the front of the neck has thin skin and sits over the thyroid, so avoid heavy pressure directly over the trachea and thyroid area (roughly the center third at mid-neck height).
- Diagonal Side-Neck Strokes: From behind the ear, stroke diagonally down and forward to the collarbone on the same side. 5 strokes each side. This follows the sternocleidomastoid muscle line and supports the lateral neck lymphatics.
- Décolletage Fan: From the center of the upper chest, fan strokes outward toward each shoulder in a spreading pattern, like opening a hand fan. 5 strokes each side.
- Note on the Thyroid: Avoid firm direct pressure on the central lower neck where the thyroid sits. Light pressure is fine; avoid digging in. If you have a diagnosed thyroid condition, keep pressure very light in this area or skip it and focus on the side-neck and décolletage strokes instead.
How Do You Perform the Body Gua Sha Routine?
Body gua sha uses a larger tool and a different technique than facial work. This section provides a condensed body routine, while the broader approach to cupping and gua sha for fascial release covers the underlying mechanisms, safety considerations, and a more detailed body-focused protocol.
- Upper Back and Shoulders (3 Minutes): Using the body tool at a 30-degree angle, work from the base of the skull outward along the top of the shoulders, then down along either side of the spine (not on the spine itself) from the shoulders to the bottom of the shoulder blades. Long smooth strokes, 5 to 10 repetitions per area.
- Arms (2 Minutes): From the wrist to the shoulder (toward the heart, supporting venous and lymphatic return), work the inner and outer forearm, then the upper arm. 5 strokes per section.
- Legs (3 Minutes): From the ankle to the knee, then the knee to the hip, working the front, sides, and back of each leg. Direction toward the heart. 5 strokes per section per leg.
- Abdomen (Light Pressure Only, 1 Minute): Gentle clockwise strokes following the direction of the large intestine, if this area feels appropriate for you. Skip if pregnant, menstruating heavily, or if you have any abdominal sensitivity.
This body sequence pairs well as a 2 to 3 times per week addition to the daily facial routine, rather than a daily practice itself, since body gua sha is more mechanically intense than facial work.
How Does a Morning Gua Sha Routine Differ From an Evening Routine?
Morning Routine (3 to 5 Minutes, Abbreviated)
Mornings call for a shorter routine focused on de-puffing and lymphatic activation to start the day. Use the full nine-step sequence but reduce strokes per step by roughly half (2 to 3 strokes instead of 5). Prioritize the under-eye and cheek steps, which address the fluid accumulation that occurs overnight from lying flat. Follow immediately with your regular morning skincare.
Evening Routine (8 to 12 Minutes, Full Sequence)
Evenings allow time for the complete nine-step routine at full length. This is also when to add the extended neck sequence 2 to 3 times per week. Evening practice has the added benefit of the parasympathetic, wind-down quality of slow ritual movement before sleep. Perform after cleansing and before your evening serum or moisturizer; the gua sha oil itself can double as your evening facial oil if you choose a nourishing option.
When to Use Gua Sha in Your Skincare Routine Specifically
Cleanse first. Apply gua sha oil. Perform the routine. If you use a separate serum, apply it after gua sha (the increased circulation may support absorption, though this is not definitively proven). Follow with moisturizer and, in the morning, sunscreen.
What Pressure, Angle, and Technique Details Actually Matter?
Tool Angle
Hold the tool at 15 to 30 degrees relative to the skin for most facial strokes. A steeper angle increases pressure and can cause redness or bruising if too aggressive. A flatter angle (closer to 15 degrees) is gentler and better for delicate areas like the under-eye and brow bone.
Pressure by Zone
- Under-eye and brow bone: Extremely light, barely more than the weight of the tool itself
- Forehead and temple: Light to medium
- Cheek: Medium
- Jawline: Medium, can increase slightly for stubborn tension
- Neck: Light to medium, always lighter over the thyroid area
Stroke Length and Speed
Long, slow, smooth strokes work better than short, fast, choppy ones. A stroke from chin to ear along the jawline should take approximately 2 to 3 seconds, not half a second. Speed defeats the purpose; the effect comes from sustained, deliberate mechanical input, not quick friction.
Number of Repetitions
3 to 5 repetitions per stroke pattern is typical. More is not necessarily better; consistency across days matters more than intensity within a single session.
Signs You Are Using Too Much Pressure
Immediate significant redness that does not fade within 10 to 15 minutes, pain during the stroke, bruising, or skin that feels raw afterward. Reduce pressure and angle if any of these occur.
Signs You Are Using Appropriate Pressure
Mild, even pinkness that fades within 10 to 20 minutes, a pleasant warming sensation, no pain, smooth glide without dragging or catching on the skin.
Free 28-Day Fascia Reset Email Course
Get our Free 28-day email course series to help with 1 or 2 exercises per day to release your fascia. One short lesson per day. Two minutes to read each.
Which Targeted Gua Sha Sequences Help With the Jawline, Double Chin, Puffiness, and Wrinkles?
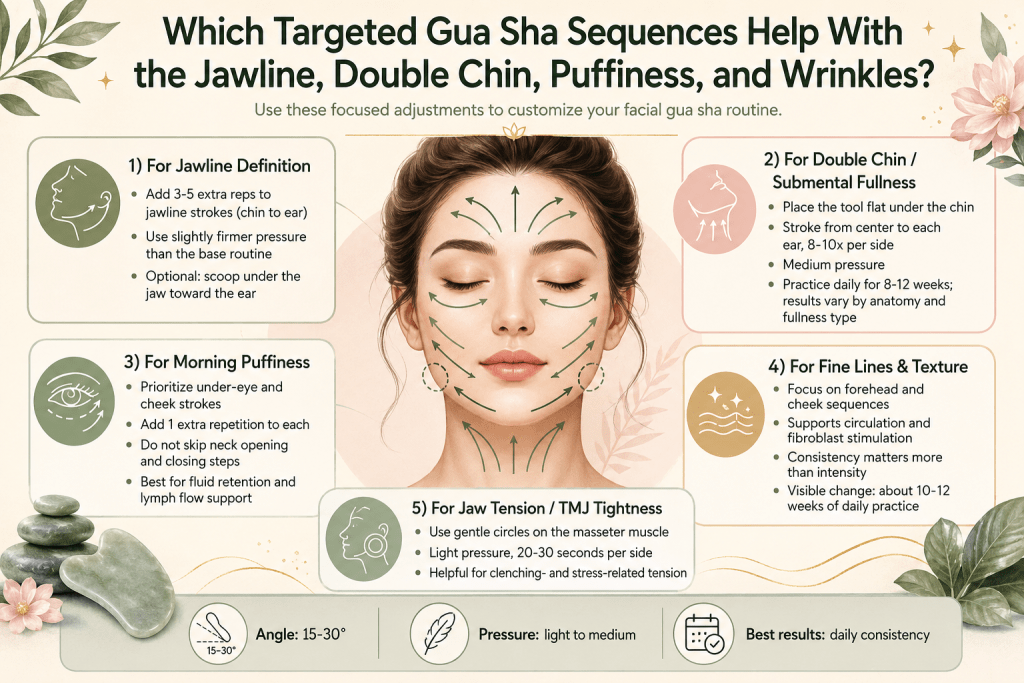
- For Jawline Definition: Add an extra 3 to 5 repetitions to Step 2 (jawline, chin to ear) daily. Use slightly firmer pressure than the base routine. Some practitioners add a “scooping” motion under the jawline, angling the tool to catch the underside of the jaw and sweep toward the ear, which specifically targets the submental area.
- For Double Chin and Submental Fullness: Place the tool flat under the chin and stroke from the center toward each ear, 8 to 10 times per side using medium pressure. Daily practice for 8 to 12 weeks may create visible changes, though results depend on anatomy and whether the fullness comes from fluid, fascia, or fat distribution.
- For Morning Puffiness: Prioritize Step 4 (under-eye) and Step 3 (cheek) with an extra repetition each, and make sure Step 0 and Step 8 (neck opening and closing) are not skipped, since puffiness is primarily a fluid retention issue that depends on clear lymphatic pathways.
- For Fine Lines and Texture: The forehead sequence (Step 6) and cheek sequence (Step 3) support the circulation and fibroblast stimulation associated with visible texture improvements. Consistency matters more than intensity here; daily practice over 10 to 12 weeks is the realistic timeline for visible texture change.
- For Jaw Tension and TMJ-Related Tightness: Add gentle circular motions (similar to Step 7’s temple circles) at the masseter muscle, located at the back of the jaw where it becomes prominent when you clench your teeth. Light pressure, 20 to 30 seconds per side. This can also support jaw tension related to stress, which many midlife women carry unconsciously.
What Should Your Weekly and Monthly Gua Sha Rhythm Look Like?
|
Frequency |
Practice |
|
Daily (morning) |
Abbreviated 3 to 5 minute facial routine |
|
Daily (evening) |
Full 8 to 12 minute facial routine |
|
2 to 3 times per week |
Extended neck and décolletage sequence |
|
2 to 3 times per week |
Body gua sha routine (upper back, arms, legs) |
|
Weekly |
Assess skin response, note any areas needing extra attention |
|
Monthly |
Deep-clean your tool; reassess technique against the video guide to catch any drift back toward random motion |
Consistency is more important than intensity. A gentle 5-minute daily practice performed consistently for 12 weeks produces more visible change than an intense 20-minute session performed sporadically once a week.
What Common Mistakes Can Undo Your Gua Sha Routine?
- Mistake: Skipping the neck opening and closing steps. This is the single most common shortcut, and it is also the step most responsible for whether the rest of the routine actually drains fluid effectively. Do not skip Steps 0 and 8.
- Mistake: Working dry skin. Always use oil or a slippery serum. Dry-skin gua sha causes friction irritation, not benefit.
- Mistake: Random direction instead of following the face map. Strokes that go in inconsistent directions, or that pull skin downward rather than up and out toward drainage points, work against gravity and lymphatic flow rather than with them.
- Mistake: Too much pressure, especially under the eyes. The under-eye area requires the lightest pressure on the entire face. Heavy pressure here can cause bruising and, over time, may stress the delicate skin unnecessarily.
- Mistake: Rushing. A 45-second version of this routine is not the routine. The slow pace is part of what produces the mechanical and nervous system benefits.
- Mistake: Inconsistency. Sporadic practice (once a week, or whenever remembered) does not produce the cumulative effects that daily or near-daily practice does.
- Mistake: Using a dirty tool. Clean your tool with soap and water after each use. A tool that has accumulated old oil and skin cells is both unhygienic and less effective at gliding smoothly.
- Mistake: Ignoring asymmetry. Most faces have some natural asymmetry in tension and fluid retention. If one side consistently shows more puffiness or tension, it is reasonable to give that side one or two extra repetitions rather than treating both sides identically.
- Mistake: Expecting one session to produce visible change. Gua sha produces some immediate effects (temporary de-puffing, warmth, glow) but the changes people are usually hoping for (jawline definition, texture, tension release) require weeks of consistent practice.
“I spent years doing exactly what most women do with a gua sha tool, which is a few random swipes while thinking about my to-do list. It was not until I actually learned the sequence, the direction, and the neck-first principle that I understood why my results had been so inconsistent. The tool was never the problem. The missing routine was the problem. Once I started opening the neck first, working in the correct direction, and finishing the same way every time, the practice went from something that occasionally seemed to do something to something that reliably changes how my face feels and looks by the end of a week. Structure is what turns a tool into a practice.”
Terry Tateossian, Founder of The House of Rose
What Does the Research Say About Facial Gua Sha Specifically?
Facial gua sha research is smaller than body-focused gua sha and cupping research, but several relevant findings exist.
- Microcirculation: Nielsen’s 2007 gua sha study found a fourfold increase in surface microperfusion at the treated area. This may help explain the temporary warmth and brightness often seen after facial gua sha.
- Lymphatic Support: Facial gua sha research is limited, but manual lymphatic drainage studies support the principle that light, directional strokes toward lymph nodes can help move fluid. Facial gua sha uses a similar approach.
- Facial Muscle Tone: Small studies and practitioner experience suggest regular facial massage may support muscle tone and reduce tension-related asymmetry. However, large gua sha-specific trials are still lacking.
- Fibroblast and Collagen Response: Mechanical stimulation may activate fibroblasts and support collagen remodeling. Most evidence comes from body-focused research, so claims about facial texture and fine-line improvements remain promising but not well established.
- Limitations: Many facial gua sha claims go beyond the available research. When performed correctly, it can offer temporary de-puffing, improved circulation, relaxation, and tension relief. Long-term use may modestly support skin texture, but claims of permanent jawline sculpting or dramatic anti-aging effects should be treated cautiously.
Free 28-Day Fascia Reset Email Course
Get our Free 28-day email course series to help with 1 or 2 exercises per day to release your fascia. One short lesson per day. Two minutes to read each.
When Should You Skip a Gua Sha Session?
Do Not Perform Gua Sha on or Near
- Active acne breakouts (can spread bacteria and worsen inflammation)
- Open wounds, cuts, or active cold sores
- Sunburned or otherwise irritated skin
- Recent cosmetic procedures (fillers, Botox, chemical peels, laser treatments) until fully healed and cleared by your provider, typically 2 weeks minimum, longer for some procedures
- Active rosacea flares (gentle practice during calm periods may be fine for some, but skip during active flares)
- Any area with a rash, infection, or unexplained skin change
Use Caution or Consult a Physician if You Have
- A bleeding disorder or are on blood thinners
- Thyroid conditions (keep pressure very light over the thyroid area)
- Any diagnosed lymphatic condition (consult your physician or a lymphedema specialist before starting)
- Recent facial surgery
General Safety Notes
Facial gua sha performed with light to medium pressure using the technique in this article is low-risk for most healthy adults. When in doubt, reduce pressure. Mild, temporary redness is normal and expected; bruising, pain, or skin damage are signs to stop and reduce intensity.
What Can You Expect From Gua Sha and When Will Results Be Visible?
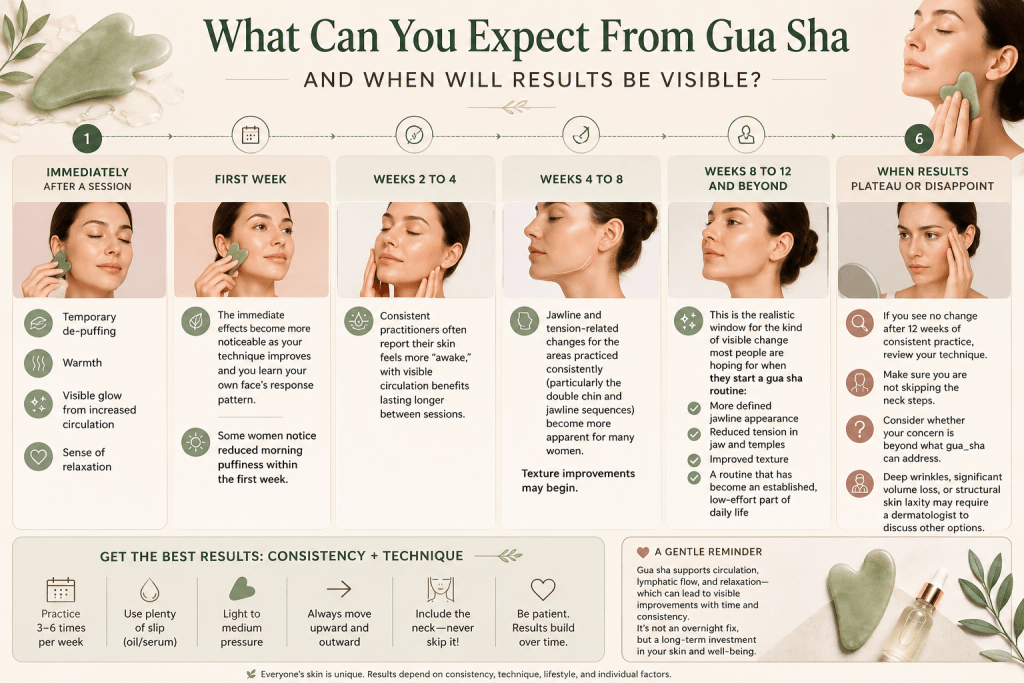
- Immediately After a Session: Temporary de-puffing, warmth, a visible glow from increased circulation, a sense of relaxation.
- First Week: The immediate effects become more noticeable as your technique improves and you learn your own face’s response pattern. Some women notice reduced morning puffiness within the first week.
- Weeks 2 to 4: Consistent practitioners often report their skin feels more “awake,” with visible circulation benefits lasting longer between sessions.
- Weeks 4 to 8: Jawline and tension-related changes for the areas practiced consistently (particularly the double chin and jawline sequences) become more apparent for many women. Texture improvements may begin.
- Weeks 8 to 12 and Beyond: This is the realistic window for the kind of visible change most people are hoping for when they start a gua sha routine: more defined jawline appearance, reduced tension in the jaw and temples, improved texture, and a routine that has become an established, low-effort part of daily life.
- When Results Plateau or Disappoint: If you see no change after 12 weeks of consistent practice, review your technique, make sure you are not skipping the neck steps, and consider whether your concern is beyond what gua sha can address. Deep wrinkles, significant volume loss, or structural skin laxity may require a dermatologist to discuss other options.
Free 28-Day Fascia Reset Email Course
Get our Free 28-day email course series to help with 1 or 2 exercises per day to release your fascia. One short lesson per day. Two minutes to read each.
Frequently Asked Questions
How often should I do my gua sha routine?
Daily for the facial routine (abbreviated in the morning, full length in the evening) produces the most consistent results. The extended neck sequence and body routine are well-suited to 2 to 3 times per week rather than daily.
How long does a full gua sha routine take?
The complete nine-step facial sequence takes 8 to 12 minutes once you know it well. An abbreviated morning version takes 3 to 5 minutes. The extended neck sequence adds 3 to 4 minutes. The body routine takes approximately 8 to 10 minutes for upper back, arms, and legs combined.
What order should I do the steps in?
Always start and end with the neck (Steps 0 and 8 in this article’s sequence). Skipping the neck-opening step is the most common reason gua sha routines feel inconsistent or ineffective, because fluid has nowhere clear to drain if the terminal pathway has not been opened first.
Do I need a different tool for my face versus my body?
Yes. Facial tools are smaller and contoured for facial curves, typically with a narrow notch for the delicate under-eye and brow area. Body tools are larger and flatter, meant to cover more surface area. Using a body tool on the face is too large and imprecise for the detailed technique the face requires; using a facial tool on the body is too small to be efficient.
Can I do gua sha every day without it being too much for my skin?
Yes, for most people, when performed with correct light-to-medium pressure. Daily gentle gua sha is generally well-tolerated. If you notice persistent redness, sensitivity, or irritation, reduce frequency to every other day and reassess your pressure and technique.
When in my skincare routine should I use gua sha?
After cleansing, before or in place of your regular facial oil step, and before serum and moisturizer. Apply gua sha oil, perform the routine, then continue with the rest of your skincare as usual.
Will gua sha actually change my jawline?
Gua sha can support the appearance of a more defined jawline through temporary de-puffing, improved circulation, and potentially modest fascia and muscle tone support with sustained practice over 8 to 12 weeks. It will not restructure bone or produce results comparable to a surgical or injectable procedure. Approach jawline claims with realistic expectations.
Is gua sha safe if I have rosacea?
Gentle practice during calm, non-flaring periods may be tolerated by some people with rosacea, but many practitioners and dermatologists recommend caution or avoidance during active flares, since mechanical stimulation and increased blood flow can aggravate rosacea symptoms for some individuals. Discuss with your dermatologist if you have rosacea and want to try gua sha.
Can I use gua sha after Botox or filler?
Wait until your provider clears you, typically a minimum of two weeks and sometimes longer depending on the specific procedure. Facial pressure and manipulation too soon after injectables can affect how the product settles. Always follow your specific provider’s guidance over general information.
What is the difference between gua sha and a jade roller?
A jade roller uses a rolling motion with continuous light pressure and is generally gentler and more suited to quick daily use. Gua sha uses a flat-edged tool with directional scraping strokes and allows for more targeted, adjustable pressure and more precise technique. Many people use both: a roller for quick daily maintenance and gua sha for a more thorough weekly or twice-daily practice.
Do I need to press hard for gua sha to work?
No. Effective gua sha uses light to medium pressure, calibrated by zone (extremely light under the eyes, medium on the jawline and cheeks). Heavy pressure increases risk of bruising and irritation without adding proportional benefit.
Can gua sha help with a double chin?
The dedicated double chin sequence in this article (Section 9) targets this area specifically and, with consistent daily practice over 8 to 12 weeks, many women report visible improvement in the appearance of submental fullness. Results depend partly on whether the fullness is primarily fascia-related, fluid-related, or fat-related, and gua sha is likely to help most with the first two.
Should I do gua sha in the morning or at night?
Both, ideally, with different lengths: an abbreviated 3 to 5 minute version in the morning for de-puffing, and the full 8 to 12 minute sequence in the evening for the deepest, most relaxing practice. If you can only do one, evening allows more time and pairs well with wind-down routines.
How do I clean my gua sha tool?
Wash with mild soap and warm water after each use. Dry thoroughly with a clean towel before storing. Avoid soaking porous stones like some jade or bian stone varieties for extended periods; a quick wash and dry is sufficient.
Can I do body gua sha and facial gua sha on the same day?
Yes, though most people find it more sustainable to do facial gua sha daily and body gua sha 2 to 3 times per week on separate or overlapping days, since body gua sha is more physically involved and time-intensive.
I write 3 essays per week on Lifestyle Medicine for women in midlife on what is happening in the body and what to do about it. No fluff, no hype. Free.
References
- Nielsen, A., Knoblauch, N. T., Dobos, G. J., Michalsen, A., & Kaptchuk, T. J. (2007). The effect of Gua Sha treatment on the microcirculation of surface tissue. Explore, 3(5), 456-466.
- Braun, M., Schwickert, M., Nielsen, A., Brunnhuber, S., Dobos, G., Musial, F., Ludtke, R., & Michalsen, A. (2011). Effectiveness of traditional Chinese “gua sha” therapy in patients with chronic neck pain: A randomized controlled trial. Pain Medicine, 12(3), 362-369.
- Zuther, J. E. (2012). Lymphedema Management: The Comprehensive Guide for Practitioners (3rd ed.). Thieme.
- International Society of Lymphology. (2020). The diagnosis and treatment of peripheral lymphedema: 2020 consensus document of the International Society of Lymphology. Lymphology, 53(1), 3-19.
- Stecco, C., Stern, R., Porzionato, A., Macchi, V., Masiero, S., Stecco, A., & De Caro, R. (2011). Hyaluronan within fascia in the etiology of myofascial pain. Surgical and Radiologic Anatomy, 33(10), 891-896.
- Schleip, R., Gabbiani, G., Wilke, J., Naylor, I., Hinz, B., Zorn, A., Jäger, H., Breul, R., Schreiner, S., & Klingler, W. (2019). Fascia is able to actively contract and may thereby influence musculoskeletal dynamics. Frontiers in Physiology, 10, 336.
- Cheatham, S. W., Kolber, M. J., & Salamh, P. A. (2016). Meta-analysis of the effects of instrument-assisted soft tissue mobilization on musculoskeletal disorders: Clinical implications. Journal of the Canadian Chiropractic Association, 60(3), 200-211.
- Wright, K. E., Skinner, S., & Zhu, S. (2023). The musculoskeletal syndrome of menopause. Climacteric, 26(4), 366-371.
- Chan, S., Yuen, J., Gohel, M., Chung, C., Wong, H., & Kwong, K. (2011). Guasha-induced hepatoprotection in chronic active hepatitis B: A case series. Clinica Chimica Acta, 412(17-18), 1686-1688.
- Kwong, K. K., Kloetzer, L., Wong, K. K., Ren, J. Q., Kuo, B., Jiang, Y., Chen, Y. I., Chan, S. T., Young, G. S., & Kaptchuk, T. J. (2009). Bioluminescence imaging of heme oxygenase-1 upregulation in the Gua Sha procedure. Journal of Visualized Experiments, (30), e1385.
Disclaimer: This article is educational and does not constitute medical advice. Gua sha involves applying pressure to the skin and may cause temporary redness, tenderness, irritation, or bruising if performed too aggressively. Avoid gua sha over broken or irritated skin, active bruising, prominent veins, or areas of unexplained pain or swelling. If you take blood thinners, have a bleeding or clotting disorder, a thyroid condition, are pregnant, or have another medical condition that may affect circulation or skin sensitivity, consult a healthcare provider before beginning the routines in this article.
Free 28-Day Fascia Reset Email Course
Get our Free 28-day email course series to help with 1 or 2 exercises per day to release your fascia. One short lesson per day. Two minutes to read each.

Terry Tateossian is a Menopause Lifestyle Medicine Coach, Certified Personal Trainer & Nutritionist and the Founder of THOR: The House of Rose, a wellness brand serving women over 40 through retreats, coaching, macro-nutrition and community. As 25-year founder and entrepreneur, Terry spent two and a half decades building and running successful start-up businesses, an experience that put her on the front line of founder burnout long before she could name it. After facing serious health challenges, early onset menopause, and emotional eating while running her agency and raising two children, Terry rebuilt her health in her 40s and lost more than 80 pounds through evidence-based nutrition, training, and mindset work. Today, she helps women get strong, improve confidence, support hormone health, and create a stronger second half of life. Terry has been featured in major media outlets and is available for podcasts, expert commentary, brand collaborations, and speaking engagements on midlife health, reinvention, emotional eating, menopause wellness, and strength training for longevity. Get her free macro calculator (her cookbook companion) to start your journey to back to health.