

 By Team THOR
Free 28-Day Fascia Reset Email Course
Get our Free 28-day email course series to help with 1 or 2 exercises per day to release your fascia. One short lesson per day. Two minutes to read each.
5 Fascia Release Exercises for Piriformis for Women Over 40 (With Videos & 5-Day Program)
Fascia release exercises for the piriformis can help address one of the most commonly missed sources of deep glute pain, sciatica-like symptoms, and hip stiffness in women over 40.
The piriformis is a small, deep muscle beneath the glutes that connects the sacrum to the top of the femur. When the muscle and surrounding fascia become restricted, they can cause a deep ache in one glute, pain that travels down the back of the thigh, persistent hip stiffness, lower back tension, and discomfort when sitting for long periods.
This pattern and plantar fasciitis are both common in midlife women. Prolonged sitting compresses the tissues, while hormonal changes can reduce fascial hydration and pliability. Stress, poor sleep, and chronically braced hip muscles can make the restriction worse.
Standard hip stretches often fail to reach the piriformis effectively. Targeted release exercises can address the muscle and surrounding fascia more directly.
I am Terry Tateossian, founder of The House of Rose and a certified lifestyle medicine coach. At our Smoky Mountains yoga & wellness retreats for women in perimenopause, menopause, and post-menopause, piriformis restriction is one of the most common body-based issues we see.
The five exercises in this article are the same movements we teach at the retreat, adapted for at-home practice. Video demonstrations are included to make each movement easier to follow.
Important: Consult your healthcare provider before beginning a new movement program, especially if you have sciatica, disc problems, previous hip surgery, pelvic floor concerns, or acute pain. Seek medical evaluation for severe or sudden pain, leg weakness or numbness, or symptoms that do not improve with appropriate self-care.
What Is the Piriformis and Why Does It Matter?
The piriformis is a small deep muscle located in the glute, hidden beneath the larger gluteus maximus. Understanding what it does, where it sits, and why it produces the specific symptom pattern it produces makes the exercise framework make sense.
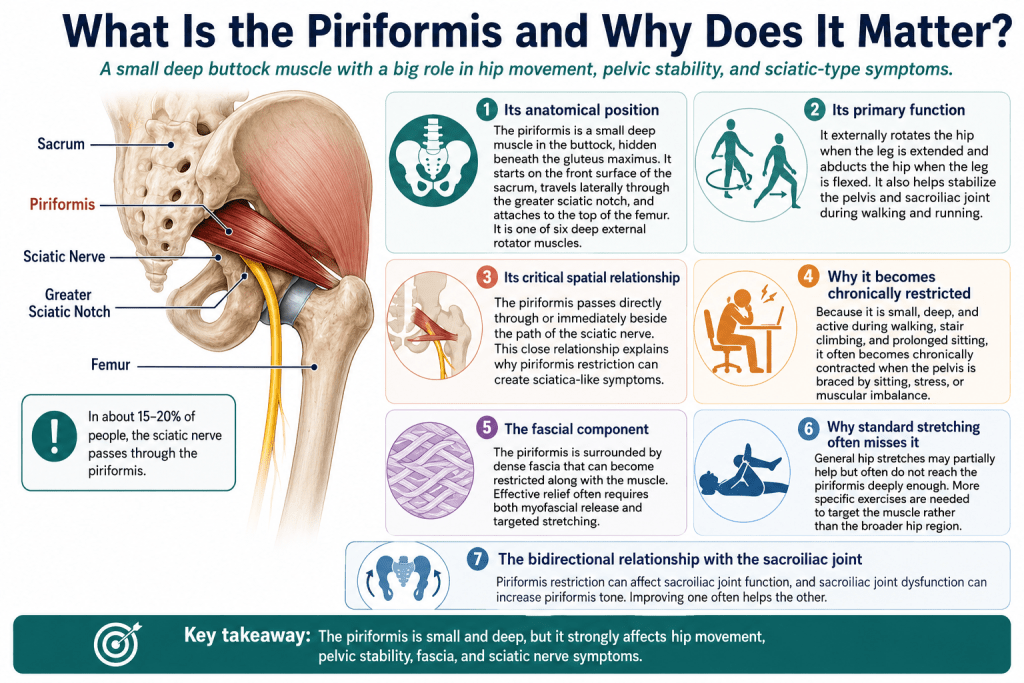
- Its anatomical position: The piriformis originates on the front surface of the sacrum (the triangular bone at the base of the spine) and travels laterally through the greater sciatic notch to attach at the top of the femur (thigh bone). It is one of six small external rotator muscles that live deep in the glutes.
- Its primary function: The piriformis primarily externally rotates the hip when the leg is extended (rotates the knee outward when standing) and abducts the hip when the leg is flexed. It also plays a role in stabilizing the pelvis and sacroiliac joint during walking and running.
- Its critical spatial relationship: The piriformis passes directly through or immediately adjacent to the path of the sciatic nerve. In approximately 15 to 20 percent of people the sciatic nerve actually passes through the piriformis muscle itself. This close spatial relationship is why piriformis restriction can produce sciatica-like symptoms.
- Why it becomes chronically restricted: The piriformis is small and deep, and it stabilizes the pelvis during many daily activities including walking, climbing stairs, and prolonged sitting. When the pelvis is chronically braced (from prolonged sitting, chronic stress, or muscular imbalances), the piriformis often becomes chronically contracted. Once chronically contracted, it becomes difficult to release with general stretching because it sits so deep and its function is difficult to isolate.
- The fascial component: The piriformis is surrounded by dense fascial tissue that becomes restricted along with the muscle itself. Addressing the piriformis effectively requires addressing both the muscle and the surrounding fascia, which is why the specific exercises in this article combine myofascial ball release with targeted stretching.
- Why standard stretching often misses it: Common hip stretches (like the pigeon pose or the standing hip flexor stretch) may partially address the piriformis but often fail to reach it deeply enough to produce meaningful release. The specific exercises in this article are chosen for their ability to access the piriformis specifically rather than the broader hip region.
- The bidirectional relationship with the sacroiliac joint: Piriformis restriction affects sacroiliac joint function, and sacroiliac joint dysfunction affects piriformis tone. Addressing one often improves the other.
Why Does the Piriformis Get Tight in Midlife Women?
The specific reasons the piriformis becomes chronically restricted in midlife women are worth understanding because they inform the broader lifestyle context that supports lasting release.
- Decades of prolonged sitting: Every hour of seated work compresses the piriformis and the surrounding fascia. For most professional women, this adds up to thousands of hours of sustained compression over decades. Muscles and fascia adapt to the position they spend the most time in.
- Hormonal changes affecting fascia: Estrogen supports connective tissue hydration and pliability. The estrogen decline of perimenopause and menopause changes fascial composition in ways that make chronic restrictions more likely to accumulate and less likely to resolve on their own.
- Cortisol elevation and sympathetic dominance: Chronic stress keeps the deep pelvic and hip musculature braced. The piriformis often participates in this bracing pattern and becomes chronically contracted as a component of the broader stress response.
- Pelvic floor changes: The pelvic floor and the deep external rotators of the hip including the piriformis are functionally connected. Pelvic floor changes common in midlife women contribute to piriformis tone changes.
- Reduced daily movement variety: Most midlife women move through fewer movement patterns per day than they did in earlier decades. The specific rotational movements that would keep the piriformis mobile happen less frequently.
- Sleep disruption prevents recovery: The nightly tissue repair that would normally prevent chronic restriction depends on adequate deep sleep, which is often disrupted in perimenopause and menopause.
- Historic exercise patterns: Women who have been long-distance runners, cyclists, or long-time yoga practitioners with a particular seated meditation practice sometimes develop specific piriformis restriction from repetitive one-sided loading.
- Body composition shifts: Changes in muscle mass, fat distribution, and posture through midlife can shift loading patterns through the pelvis and hip in ways that place more demand on the piriformis.
- The compensatory pattern: Once the piriformis is restricted, the body compensates through altered gait, altered posture, and altered movement patterns. These compensations reinforce the restriction and add layers of secondary dysfunction that also need addressing.
“The specific piriformis pattern is one of the fastest wins I see in coaching clients and retreat guests, because the muscle responds relatively quickly to appropriate release when the right combination of interventions is applied. Most women arrive with the deep glute pain, the false-sciatica pattern down the leg, or the specific difficulty sitting for long meetings, and they have often been managing it for months or years without a specific name for what is happening. Within two to three weeks of consistent daily practice using the five exercises in this article, the majority of these women report meaningful reduction in the pain and stiffness. It is one of the most satisfying interventions to teach because the results appear so quickly and the framework is so accessible for women to install at home.”
Terry Tateossian, Founder of The House of Rose
Free 28-Day Fascia Reset Email Course
Get our Free 28-day email course series to help with 1 or 2 exercises per day to release your fascia. One short lesson per day. Two minutes to read each.
What Are the Signs of Piriformis Restriction?
The pattern of piriformis restriction is specific and recognizable once named. Several signs commonly appear together and often point more clearly to piriformis involvement than to other conditions with similar symptoms.
What Pain Patterns Are Most Common?
Piriformis restriction often produces pain deep within one glute, sometimes with discomfort that spreads into nearby areas.
- Deep constant ache in one glute: The pain is typically located deep in the middle of the glute rather than near the surface. It often feels like a tight knot that will not release and may worsen with prolonged sitting.
- Pain radiating down the back of the thigh: This sciatica-like pattern occurs because of the close spatial relationship between the piriformis and the sciatic nerve. The pain typically travels into the back of the thigh and may extend to the back of the knee.
- Pain that does not extend below the knee: Piriformis-related discomfort generally does not travel into the lower leg or foot. Symptoms that extend below the knee may suggest a different underlying cause.
- Tension referring to the lower back: The referred pain pattern often includes tightness in the lower back on the same side as the affected glute.
How Does Sitting Affect the Symptoms?
Prolonged sitting commonly aggravates piriformis restriction because it places sustained pressure on the glutes and keeps the hip in a fixed position.
- Difficulty sitting for extended periods: A common complaint is the need to shift weight repeatedly while sitting or to stand up periodically for relief.
- Aching after long car drives or plane flights: Remaining seated in a fixed position for an extended period often worsens the pattern.
- Pain that changes with sitting position: Sitting cross-legged with the affected leg on top, or sitting on a hard surface, can change or increase the intensity of the symptoms.
What Movement and Physical Signs Can Appear?
The restriction may also become noticeable during everyday movement or when pressure is applied directly to the area.
- Hip stiffness that does not resolve with general stretching: Standard hip flexor or hamstring stretches often do not reach the specific area of restriction.
- Discomfort climbing stairs: The external rotation demand involved in stair climbing can sometimes produce or worsen the pain.
- Tenderness deep in the glutes: Pressing firmly into the middle of the glute, where the piriformis lies beneath the surface muscles, often reveals tight and tender tissue.
Do Symptoms Vary Between Women?
Not every case of piriformis restriction produces all of these signs. Some women experience primarily glute or hip pain without radiating symptoms, while others notice the pattern more as stiffness or functional limitation than as pain. The pattern is common and specific enough that recognizing several of these signs together is worth taking seriously.
What Is the Difference Between Piriformis Syndrome and Simple Piriformis Restriction?
Piriformis syndrome and simple piriformis restriction are related but not identical. Understanding the distinction affects how the framework applies.
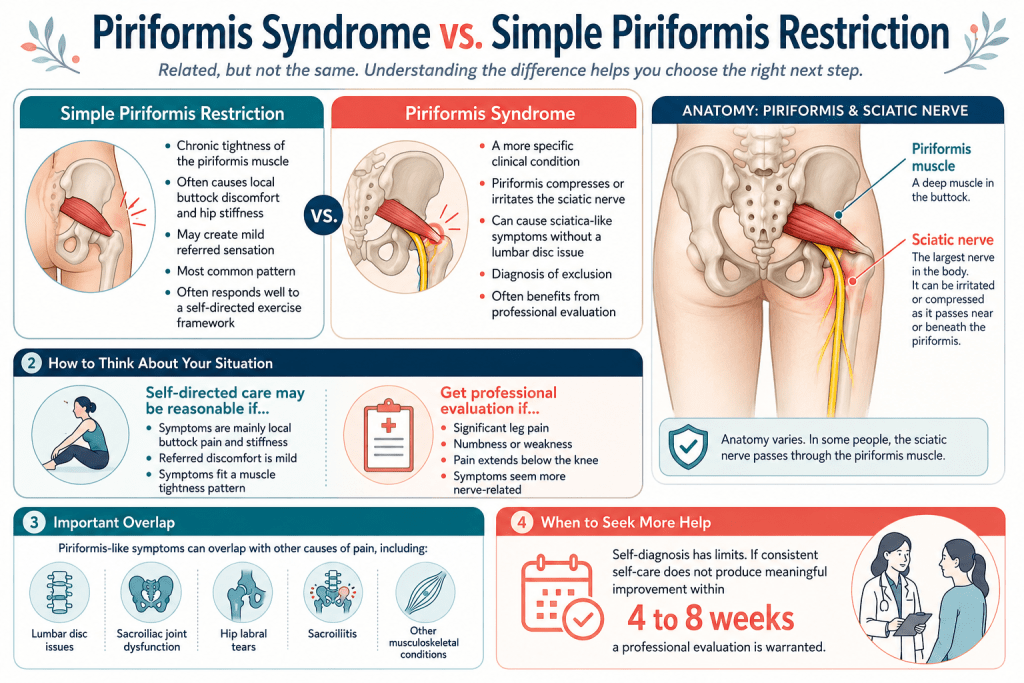
- Simple piriformis restriction: Chronic tightness of the piriformis muscle producing local discomfort, hip stiffness, and possibly some referred sensation. This is the most common pattern and responds well to the exercise framework in this article.
- Piriformis syndrome: A more specific clinical condition in which the piriformis compresses or irritates the sciatic nerve, producing sciatica-like symptoms without an underlying lumbar disc issue. Piriformis syndrome is a diagnosis of exclusion (meaning other causes of sciatica must be ruled out first), and its diagnosis and management often benefit from professional evaluation.
- How to think about your situation: If your symptoms are primarily local glute pain and stiffness with mild referred discomfort, the framework in this article is a reasonable self-directed intervention. If your symptoms include significant leg pain, numbness, weakness, or pain that extends below the knee, professional evaluation is important before assuming the pattern is piriformis-based.
- The overlap with other conditions: Piriformis-like symptoms can be produced by lumbar disc issues, sacroiliac joint dysfunction, hip labral tears, sacroiliitis, and other conditions. Self-diagnosis is limited. If self-care does not produce meaningful improvement within four to eight weeks of consistent practice, a professional evaluation is warranted.
Free 28-Day Fascia Reset Email Course
Get our Free 28-day email course series to help with 1 or 2 exercises per day to release your fascia. One short lesson per day. Two minutes to read each.
What Does the Research Show About Piriformis Release?
The research on piriformis release, piriformis syndrome, and myofascial release for hip pain has grown substantially over the last two decades.
- Piriformis syndrome prevalence: Piriformis syndrome is estimated to account for approximately 6 to 8 percent of all cases of low back and glute pain, though estimates vary because of the diagnostic challenges.
- Myofascial release effectiveness: Multiple systematic reviews have documented benefits of myofascial release techniques including self-myofascial release with foam rollers and balls for reducing pain and improving range of motion in various musculoskeletal conditions including piriformis-related pain.
- Stretching effectiveness: Piriformis stretching has been documented to reduce symptoms and improve function in piriformis syndrome in multiple studies, particularly when combined with other conservative measures.
- The combination approach: Combining myofascial release with targeted stretching produces better outcomes than either intervention alone in most piriformis-focused studies.
- Timing of results: Meaningful improvements in piriformis symptoms typically appear within two to four weeks of consistent daily practice combined with attention to seated posture, movement breaks, and general activity level.
- The mind-body component: Chronic piriformis restriction is often maintained in part by chronic sympathetic activation. Addressing the nervous system through breath work and relaxation practices supports the physical interventions. See our vagus nerve reset exercises article for the nervous system framework.
- Long-term maintenance: Regular practice maintains the improvements. Sporadic practice tends to allow the pattern to return over time. The daily rhythm matters more than any single intense session.
What Should You Know Before Starting These Exercises?
Several principles apply to all five exercises in this article and are worth internalizing before beginning.
- Breath is essential: Every exercise is significantly more effective when combined with slow diaphragmatic breathing. Extended exhalation amplifies the release effect.
- Slow is the direction: The piriformis responds to sustained gentle pressure and slow stretching. Forceful stretching often produces protective muscle guarding that undermines the release.
- Comfort matters: Use props (folded blankets, small pillows, bolsters) generously. If a position produces sharp pain, modify or skip it.
- Consistency beats intensity: Ten to fifteen minutes daily produces more benefit than an hour once a week.
- Never work into sharp pain: Discomfort at a stretch is normal. Sharp pain, radiating pain, or nerve-like sensations (numbness, tingling, electric feelings) are signals to stop and reassess.
- Warm up briefly: Two or three minutes of gentle walking or hip circles before starting improves the tissue response.
- Equipment needed: A yoga mat or comfortable surface, a therapy ball or tennis ball for Exercise 1, and a wall for Exercise 4. Total equipment investment approximately $20 to $30.
- Practice on both sides even if one side hurts more: Restriction is often bilateral even when symptoms are one-sided. Practicing on both sides prevents developing new imbalances.
- Time of day: Any time works. Morning practice supports easier movement throughout the day. Evening practice supports sleep by releasing accumulated tension.
- Do not push through nerve symptoms: Any radiating pain, tingling, numbness, or electric sensations warrant stopping and reassessing. These signal nerve involvement and may require different intervention or professional evaluation.
Free 28-Day Fascia Reset Email Course
Get our Free 28-day email course series to help with 1 or 2 exercises per day to release your fascia. One short lesson per day. Two minutes to read each.
What Are the 5 Best Fascia Release Exercises for the Piriformis?
These five fascia release exercises combine targeted pressure, sustained stretching, supported movement, and gentle rotation to reduce piriformis tension and improve hip mobility in women over 40. The sequence begins with direct myofascial release, progresses through floor-based and standing stretches, and ends with an integrating seated twist. Practice each exercise slowly, use only comfortable pressure, and modify the position whenever you experience joint pain or nerve-like sensations.
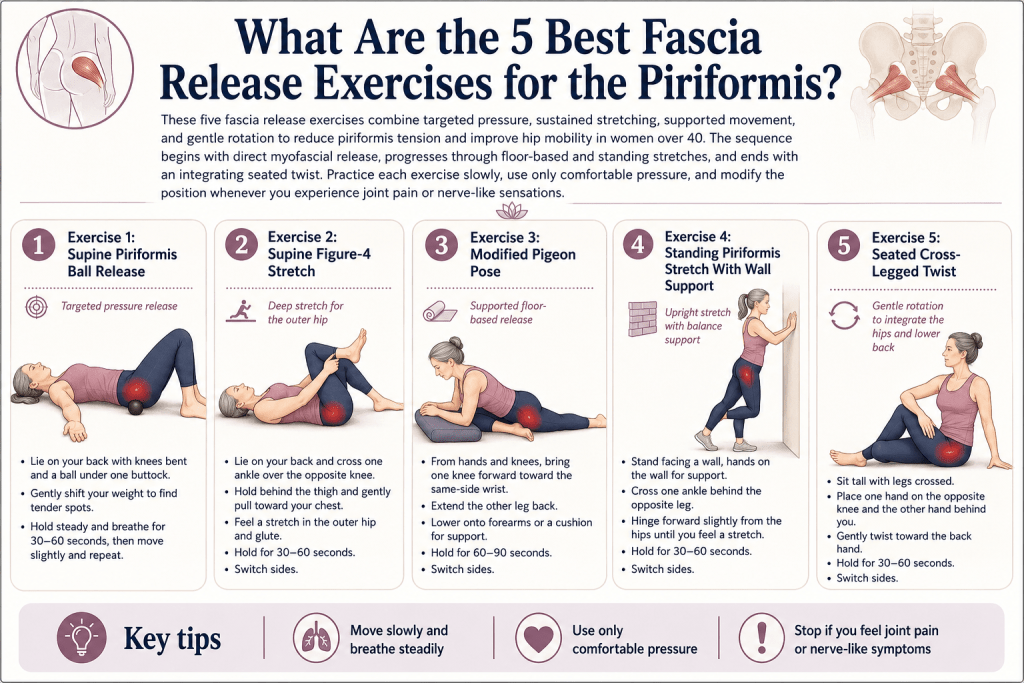
Exercise 1: Supine Piriformis Ball Release
The Supine Piriformis Ball Release is the most targeted single intervention in the sequence. It uses gentle sustained pressure directly on the piriformis muscle to produce myofascial release. Most women feel a distinct softening deep in the glute within the first or second session.
Use a therapy ball, tennis ball, or lacrosse ball to apply gentle, controlled pressure to the piriformis. Beginners should start with a softer ball or place a tennis ball inside a sock if direct pressure feels too intense.
- Sit on the floor with the ball beside you.
- Place the ball on the floor and slowly lower yourself until it rests under the middle of your right glute.
- Cross your right ankle over your left knee to form a figure-4 position.
- Gradually shift your body weight onto the ball.
- Rock gently from side to side and up and down until you locate the spot that produces the deepest release response.
- Settle onto that spot and breathe slowly for 60 to 90 seconds.
- Carefully shift your weight away from the ball and return to the starting position.
- Switch sides and repeat the process under your left glute.
The guidance below explains how the exercise releases the piriformis, how long to perform it, and which mistakes to avoid. It also covers why it is useful for midlife women, how to adjust the pressure for sensitivity, and when to stop or modify the exercise.
- How it works: Gentle sustained pressure on the belly of the piriformis muscle produces a release response through the myofascial system and the local nervous system. The supine position uses body weight to provide the pressure without requiring active work, and the crossed-leg position specifically stretches the piriformis while the pressure is applied.
- Sets and reps: 1 or 2 rounds per side. Total time approximately 8 to 12 minutes.
- Common mistakes: Using too hard a ball, applying too much pressure, holding the breath, staying on one spot too long without exploring, ignoring nerve-like sensations if they appear.
- Why this exercise for midlife women: This is the most direct piriformis intervention in the sequence and produces the most immediate subjective release for most women. It is safe when done with appropriate pressure and body positioning.
- Modification for high sensitivity: Start with a softer ball or a rolled towel. Reduce the duration to 30 to 60 seconds. Progress the pressure and duration over weeks.
- When to skip or modify: If you experience significant nerve-like sensations (numbness, tingling, electric feelings), stop the exercise. Nerve symptoms suggest the ball is pressing directly on the sciatic nerve rather than on the muscle, and continuing can produce nerve irritation.
Exercise 2: Supine Figure-4 Stretch
The Supine Figure-4 Stretch is one of the most accessible piriformis stretches available. It produces meaningful stretch of the piriformis in a stable safe position that most women can access without difficulty.
This gentle figure-4 stretch targets the piriformis and other deep muscles in the glutes. Move slowly and use steady breathing to help the hip relax without forcing the position.
- Lie on your back on a comfortable surface.
- Bend both knees and place your feet flat on the floor.
- Cross your right ankle over your left thigh, just above the knee, to create a figure-4 shape.
- Reach both hands through the space between your legs and hold the back of your left thigh.
- Gently pull your left thigh toward your chest until you feel a deep stretch in your right glute.
- Press your right knee gently away from your body to open the hip further.
- Hold the position for 60 to 90 seconds while breathing slowly.
- Release the stretch and repeat on the opposite side.
This stretch gently lengthens the piriformis and surrounding hip tissues while keeping the body supported on the floor. The guidance below explains how it works, how often to perform it, common mistakes, modifications, and ways to progress safely.
- How it works: The figure-4 position places the crossed leg’s piriformis in a lengthened position, and drawing the other thigh toward the chest deepens the stretch specifically at the piriformis of the crossed leg.
- Sets and reps: 2 to 3 rounds per side.
- Common mistakes: Pulling too hard and creating hip pain, holding the breath, letting the crossed knee collapse toward the body (which reduces the stretch), tensing the shoulders and neck.
- Why this exercise for midlife women: The Supine Figure-4 is safe, accessible, and effective for most bodies. It is a good exercise to do while watching television or as a wind-down before sleep because it can be sustained comfortably for the recommended duration.
- Modification for tight hips: Rest a strap or towel around the back of the thigh instead of using your hands, which allows a comfortable hold even for women who cannot easily reach through their legs. Use a pillow under the head for neck comfort.
- Progression: Add a slight rotation of the trunk toward the crossed leg for additional stretch through the deeper hip fascia. Hold longer.
Free 28-Day Fascia Reset Email Course
Get our Free 28-day email course series to help with 1 or 2 exercises per day to release your fascia. One short lesson per day. Two minutes to read each.
Exercise 3: Modified Pigeon Pose
Modified Pigeon Pose is a deeper piriformis stretch drawn from the yoga tradition. It requires more hip mobility than the Supine Figure-4 but produces a more intense stretch when accessible.
This deep hip stretch targets the piriformis and surrounding gluteal muscles while improving hip flexibility. Move into the pose gradually, keep the pelvis level, and use support whenever needed.
Pigeon Pose provides a deep piriformis stretch that can improve hip mobility and reduce persistent glute tension. The guidance below explains how it works, how long to hold it, common mistakes to avoid, and safer modifications for tight hips or knee concerns.
- How it works: The forward-leg position in Pigeon Pose places the piriformis of the front leg in a deep lengthened position. Combined with slow breath and gradual settling into the pose, the stretch produces significant release.
- Sets and reps: 1 or 2 rounds per side. Total time approximately 4 to 6 minutes.
- Common mistakes: Letting the pelvis tilt (which reduces the stretch and can strain the low back), forcing the depth too fast, holding the breath, letting the back knee slide out of alignment.
- Why this exercise for midlife women: Pigeon Pose produces one of the deepest piriformis stretches available. Regular practice significantly improves external rotation range of motion and often produces noticeable reduction in chronic glute tension within two to three weeks.
- Modification for tight hips: Do a supported version with the front leg less angled (more like a runner’s lunge with the front knee bent). Use a bolster under the front hip to support the pelvis. Stay upright longer before folding forward. Practice the Supine Figure-4 (Exercise 2) exclusively until hip mobility improves enough to access Pigeon comfortably.
- Modification for knee issues: Skip this exercise entirely if you have significant knee issues. The Supine Figure-4 covers the same target area more safely.
Exercise 4: Standing Piriformis Stretch With Wall Support
The Standing Piriformis Stretch is the functional integration exercise that can be done throughout the workday to interrupt the seated compression pattern. It uses a wall for balance support.
Use a wall for support as you move into this standing figure-4 stretch, which targets the deep muscles of the glutes and outer hip. Keep the movement slow and controlled to maintain balance and avoid placing unnecessary strain on the standing knee.
This upright piriformis stretch combines a standing figure-4 position with a controlled mini-squat to improve hip mobility while supporting functional movement. The guidance below explains how it works, how often to perform it, common mistakes, modifications, and ways to progress safely.
- How it works: The standing figure-4 position combined with the mini-squat of the standing leg produces a targeted piriformis stretch in an upright position that is closer to real-world hip loading than floor-based stretches.
- Sets and reps: 2 to 3 rounds per side.
- Common mistakes: Letting the standing knee cave inward, rounding the back forward, holding the breath, forcing the depth too quickly.
- Why this exercise for midlife women: This is the exercise that most easily fits into a workday. Done as a two-minute break every couple of hours between meetings, it interrupts the seated compression pattern in real time and prevents the accumulation of piriformis restriction that all-day sitting produces.
- Modification for balance: Use a countertop or the back of a sturdy chair for additional support. Reduce the depth of the squat.
- Progression: Reduce reliance on the wall over time. Increase the depth of the squat. Add a slight forward lean while keeping the back straight for additional stretch.
Free 28-Day Fascia Reset Email Course
Get our Free 28-day email course series to help with 1 or 2 exercises per day to release your fascia. One short lesson per day. Two minutes to read each.
Exercise 5: Seated Cross-Legged Twist
The Seated Cross-Legged Twist combines the deep hip stretch of the cross-legged sitting position with a spinal rotation that addresses the fascial connections between the piriformis, the deep hip rotators, and the spinal fascia. It closes the sequence with a whole-body integration.
This gentle seated twist improves spinal mobility while releasing tension through the hips, back, and waist. It can be performed on the floor or in a chair for greater comfort and accessibility.
- Sit on the floor with your legs crossed in a comfortable position. Use a folded blanket or cushion under the hips if needed, or sit upright in a chair with both feet flat on the floor.
- Place your right hand on your left knee and your left hand on the floor behind you.
- Inhale and lengthen your spine upward, keeping the chest lifted.
- Exhale and gently rotate your torso to the left without forcing the movement.
- Look over your left shoulder if this feels comfortable for your neck.
- Hold the twist for 5 to 8 slow breaths, lengthening the spine with each inhale and gently deepening the rotation with each exhale.
- Slowly return to the center.
- Uncross and re-cross your legs with the opposite leg on top, then repeat the twist on the other side.
This gentle seated twist combines a piriformis stretch with controlled spinal rotation to release tension through the hips, lower back, and posterior chain. The guidance below explains how to perform it effectively, avoid common mistakes, and adjust the position for comfort and mobility.
- How it works: The crossed-leg position places both piriformis muscles in a mild stretch. The spinal twist adds a rotational input that addresses the fascial connections through the deep hip and lower back. Combined with breath, the exercise produces a felt-sense of integration through the whole posterior chain.
- Sets and reps: 1 or 2 rounds per side.
- Common mistakes: Twisting from the neck rather than through the trunk, hunching the shoulders, holding the breath, forcing the depth beyond what feels comfortable.
- Why this exercise for midlife women: The Seated Cross-Legged Twist integrates the piriformis release with the broader deep hip and spinal fascia, and it serves as a whole-body closing that most women find deeply settling. It also introduces the seated meditation position, which many women find useful as a bridge to a breath or meditation practice.
- Modification for tight hips: Sit in a chair instead of on the floor. Cross the right leg over the left knee if the cross-legged floor position is not accessible.
How Can You Follow This 5-Day Piriformis Release Program?
The five exercises above form the core of the practice. The 5-day program combines them into a structured progressive sequence designed to produce meaningful piriformis release within one week. Total time commitment per day ranges from 12 to 22 minutes.
Day 1: Foundation (12 Minutes)
The first day establishes the foundation with two accessible exercises.
|
Exercise |
Duration |
|
Warm-up (gentle walking or hip circles) |
3 min |
|
Supine Piriformis Ball Release, both sides |
6 min |
|
Supine Figure-4 Stretch, both sides |
3 min |
Day 1 is deliberately simple. The purpose is to introduce the ball release and the basic stretch without overwhelming.
Day 2: Add Full Stretch (15 Minutes)
The second day builds the Supine Figure-4 duration.
|
Exercise |
Duration |
|
Warm-up |
3 min |
|
Supine Piriformis Ball Release, both sides |
6 min |
|
Supine Figure-4 Stretch, both sides |
6 min |
Day 3: Add Pigeon (18 Minutes)
The third day adds the deeper yoga-based stretch.
|
Exercise |
Duration |
|
Warm-up |
3 min |
|
Supine Piriformis Ball Release, both sides |
5 min |
|
Supine Figure-4 Stretch, both sides |
4 min |
|
Modified Pigeon Pose, both sides |
6 min |
Day 4: Add Standing Stretch (20 Minutes)
The fourth day adds the functional standing stretch.
|
Exercise |
Duration |
|
Warm-up |
3 min |
|
Supine Piriformis Ball Release, both sides |
5 min |
|
Supine Figure-4 Stretch, both sides |
4 min |
|
Modified Pigeon Pose, both sides |
5 min |
|
Standing Piriformis Stretch with Wall, both sides |
3 min |
Day 5: Full Sequence (22 Minutes)
The fifth day integrates all five exercises into the complete sequence.
|
Exercise |
Duration |
|
Warm-up |
3 min |
|
Supine Piriformis Ball Release, both sides |
4 min |
|
Supine Figure-4 Stretch, both sides |
4 min |
|
Modified Pigeon Pose, both sides |
5 min |
|
Standing Piriformis Stretch with Wall, both sides |
3 min |
|
Seated Cross-Legged Twist, both sides |
3 min |
Free 28-Day Fascia Reset Email Course
Get our Free 28-day email course series to help with 1 or 2 exercises per day to release your fascia. One short lesson per day. Two minutes to read each.
How Does the 5-Day Progressive Program Work?
The first five days establish the pattern. From day six forward, the most effective practice is a daily session of 15 to 20 minutes cycling through the exercises with slight variation. Once a week, repeat the full Day 5 sequence for a deeper integration. In addition, add the Standing Piriformis Stretch with Wall as a 2-minute break every two to three hours throughout the workday to interrupt the seated compression pattern in real time.
Subjective release is often noticeable within the first two or three sessions. Meaningful reductions in deep glute pain, referred leg discomfort, and hip stiffness generally appear within two to three weeks of consistent daily practice. Deeper structural changes develop over two to three months.
“The women who see the biggest results from this program are always the ones who add the Standing Piriformis Stretch as a workday interruption on top of the daily practice at home. Piriformis restriction is fundamentally a chronic compression problem produced by prolonged sitting. The at-home practice reverses the accumulated restriction, and the workday interruptions prevent the pattern from reaccumulating. Doing only one or the other produces meaningful results. Doing both produces significant lasting change within a month. That is the framework I recommend, and it is what consistently produces the results that women describe as feeling like they got their body back.”
Terry Tateossian, Founder of The House of Rose
What Common Mistakes Can Undermine Piriformis Release Practice?
Six mistakes consistently reduce the effectiveness of piriformis release practice for midlife women.
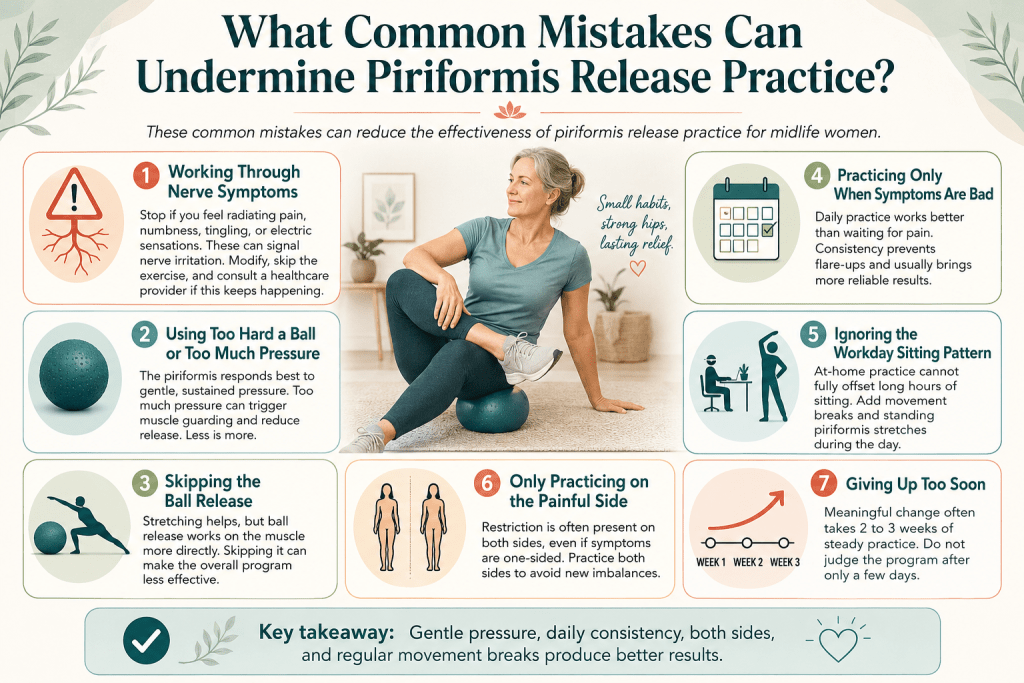
- Working through nerve symptoms: Any radiating pain, numbness, tingling, or electric sensations warrant stopping the exercise. These signal nerve involvement and pushing through them can produce nerve irritation. If nerve symptoms consistently appear during specific exercises, modify or skip those exercises and consult a healthcare provider.
- Using too hard a ball or too much pressure: The piriformis responds to gentle sustained pressure. Aggressive pressure produces muscle guarding that undermines the release. Less is more.
- Skipping the ball release in favor of only stretching: The ball release addresses the muscle directly in ways that stretching alone does not. Skipping it reduces the effectiveness of the whole program.
- Practicing only when symptoms are bad: The most reliable results come from daily practice regardless of symptom intensity. Waiting for pain before practicing produces less benefit than consistent daily practice as prevention.
- Ignoring the workday sitting pattern: All the at-home practice cannot fully compensate for continuous seated compression. Adding movement breaks and the Standing Piriformis Stretch throughout the workday is essential for lasting results.
- Only practicing on the painful side: Restriction is often bilateral even when symptoms are one-sided. Practicing on both sides prevents developing new asymmetries.
- Giving up too soon: Meaningful changes require two to three weeks of consistent practice. Judging the program on the basis of two or three days produces false negatives.
Free 28-Day Fascia Reset Email Course
Get our Free 28-day email course series to help with 1 or 2 exercises per day to release your fascia. One short lesson per day. Two minutes to read each.
When Should You See a Healthcare Professional?
Most midlife women can safely begin this program on their own. Some situations warrant professional evaluation first.
- Significant leg pain: Pain that extends below the knee or into the foot, or that includes numbness or weakness, requires evaluation to rule out lumbar disc issues or nerve compression.
- Sudden severe pain: Any sudden severe onset of glute or leg pain warrants evaluation before assuming it is piriformis-related.
- Failure to improve: If four to six weeks of consistent practice does not produce meaningful improvement, professional evaluation is warranted. Piriformis-like symptoms can be produced by other conditions that require different management.
- History of hip or lumbar surgery: Any prior significant surgery warrants clearance before starting new movement work.
- Pregnancy: Some exercises need modification during pregnancy. Skip the ball release entirely. Work with a prenatal-informed practitioner.
- Pelvic organ prolapse: Work with a pelvic floor physical therapist for individualized guidance.
- Severe balance concerns: Modify the standing exercises with additional support or substitute floor-based options.
- Any concerning symptoms during practice: Sharp pain, radiating nerve symptoms, dizziness, or other concerning symptoms warrant stopping and evaluating.
What Should You Do Next?
If the framework in this article resonates and you want to install a piriformis release practice, here are the four next steps in order of friction.
- Start today with Day 1 of the program. Twelve minutes and a comfortable surface. Ball release plus Supine Figure-4 stretch. Basic setup only.
- Complete the full 5-day program this week. Follow the daily protocols in Section 12. Track how the body feels each day.
- Add workday interruptions. Practice the Standing Piriformis Stretch with Wall as a two-minute break every two to three hours throughout the workday. This prevents the seated compression pattern from reaccumulating.
Free 28-Day Fascia Reset Email Course
Get our Free 28-day email course series to help with 1 or 2 exercises per day to release your fascia. One short lesson per day. Two minutes to read each.
Frequently Asked Questions
What causes piriformis tightness in women over 40?
Piriformis tightness in midlife women is driven by decades of prolonged sitting, hormonal changes in perimenopause and menopause that affect fascial pliability, chronic stress and cortisol elevation that keeps deep hip musculature braced, sleep disruption that impairs tissue repair, and reduced daily movement variety. Most midlife women experience several of these factors simultaneously.
How do I know if I have piriformis syndrome or just tightness?
Simple piriformis tightness typically produces local glute discomfort, hip stiffness, and mild referred sensation. Piriformis syndrome is a more specific condition where the piriformis compresses the sciatic nerve, producing sciatica-like leg pain, sometimes with numbness or weakness. Piriformis syndrome is a clinical diagnosis of exclusion and often benefits from professional evaluation.
How long does it take to release a tight piriformis?
Subjective release is often noticeable within the first two or three sessions. Meaningful reductions in pain and stiffness generally appear within two to three weeks of consistent daily practice. Deeper structural changes develop over two to three months.
Can I release my piriformis with just a tennis ball?
Yes, a tennis ball works well for the Supine Piriformis Ball Release. Softer balls are better for beginners. A lacrosse ball is firmer for more advanced release work. A rolled-up tennis ball in a sock provides an even gentler starting option.
Do piriformis stretches help sciatica?
If your sciatica-like symptoms are caused by piriformis compression of the sciatic nerve, piriformis stretches often help substantially. If your symptoms are caused by lumbar disc issues or other conditions, piriformis stretches may provide only partial relief and other interventions are important. Persistent or severe sciatica warrants professional evaluation.
How often should I do piriformis release exercises?
Daily practice for 15 to 20 minutes produces the most reliable results. Sporadic practice produces sporadic results. The 5-day program in this article establishes the pattern, and a daily maintenance practice of 10 to 15 minutes keeps the improvements in place.
Is Pigeon Pose safe for the piriformis?
Modified Pigeon Pose is generally safe and effective for the piriformis when the pelvis is kept square and the pose is entered gradually. Aggressive depth or misalignment can produce hip or knee discomfort. If Pigeon Pose is not accessible, the Supine Figure-4 Stretch (Exercise 2 in this article) covers the same target area safely.
Should I foam roll or ball release the piriformis?
Ball release is generally more effective than foam rolling for the piriformis because the piriformis is a small deep muscle that benefits from focused pressure. A therapy ball or tennis ball delivers this focused pressure better than a large foam roller.
Can piriformis tightness cause lower back pain?
Yes, chronic piriformis restriction commonly refers tension into the lower back on the same side. The sacroiliac joint dysfunction that often accompanies piriformis restriction adds to the lower back pattern. Releasing the piriformis often produces meaningful reduction in the referred lower back tension.
What is the best stretch for piriformis?
There is no single best stretch. The Supine Figure-4 Stretch is the most accessible for most people. Modified Pigeon Pose provides a deeper stretch when accessible. The Standing Piriformis Stretch with Wall is the most practical for workday use. The combination of all three plus the ball release is more effective than any single exercise alone.
Can piriformis release help hip pain in menopause?
Piriformis restriction is one common cause of hip discomfort in midlife women. Releasing the piriformis often produces meaningful reduction in hip pain and improved external rotation range of motion. If piriformis release does not resolve the hip pain within four to six weeks, professional evaluation for other hip conditions is warranted.
Does sitting too much cause piriformis problems?
Prolonged sitting is one of the largest contributors to piriformis restriction. Every hour of sitting compresses the piriformis and surrounding fascia. Adding movement breaks and the Standing Piriformis Stretch throughout the workday is essential for preventing and resolving the restriction pattern.
Can I do these exercises during pregnancy?
Some exercises need modification during pregnancy. Skip the Supine Piriformis Ball Release entirely. The Supine Figure-4 Stretch and Modified Pigeon Pose can be modified for pregnancy but need adjustment. Work with a prenatal-certified practitioner for individualized guidance.
Free 28-Day Fascia Reset Email Course
Get our Free 28-day email course series to help with 1 or 2 exercises per day to release your fascia. One short lesson per day. Two minutes to read each.
Should I feel a stretch or pain during these exercises?
You should feel a distinct stretch sensation deep in the glutes, but not sharp pain and never nerve-like sensations (numbness, tingling, electric feelings). If you experience nerve symptoms, stop the exercise and consult a healthcare provider.
How is piriformis release different from psoas release?
The piriformis is a small deep muscle in the glutes that primarily externally rotates the hip. The psoas is a large deep muscle in the front of the pelvis that primarily flexes the hip. Both can become chronically restricted in midlife women, and both benefit from targeted release work. See our tight psoas article for the psoas framework.
References
- Boyajian-O’Neill, L. A., McClain, R. L., Coleman, M. K., & Thomas, P. P. (2008). Diagnosis and management of piriformis syndrome: an osteopathic approach. Journal of the American Osteopathic Association, 108(11), 657–664.
- Cass, S. P. (2015). Piriformis syndrome: a cause of nondiscogenic sciatica. Current Sports Medicine Reports, 14(1), 41–44.
- Miller, T. A., White, K. P., & Ross, D. C. (2012). The diagnosis and management of piriformis syndrome: myths and facts. Canadian Journal of Neurological Sciences, 39(5), 577–583.
- Michel, F., Decavel, P., Toussirot, E., et al. (2013). Piriformis muscle syndrome: diagnostic criteria and treatment of a monocentric series of 250 patients. Annals of Physical and Rehabilitation Medicine, 56(5), 371–383.
- Kean Chen, C., & Nizar, A. J. (2013). Prevalence of piriformis syndrome in chronic low back pain patients: a clinical diagnosis with modified FAIR test. Pain Practice, 13(4), 276–281.
- Beatty, R. A. (1994). The piriformis muscle syndrome: a simple diagnostic maneuver. Neurosurgery, 34(3), 512–514.
- Fishman, L. M., Dombi, G. W., Michaelsen, C., et al. (2002). Piriformis syndrome: diagnosis, treatment, and outcome, a 10-year study. Archives of Physical Medicine and Rehabilitation, 83(3), 295–301.
- Kirschner, J. S., Foye, P. M., & Cole, J. L. (2009). Piriformis syndrome, diagnosis and treatment. Muscle and Nerve, 40(1), 10–18.
- Ajimsha, M. S., Al-Mudahka, N. R., & Al-Madzhar, J. A. (2015). Effectiveness of myofascial release: systematic review of randomized controlled trials. Journal of Bodywork and Movement Therapies, 19(1), 102–112.
- Beardsley, C., & Škarabot, J. (2015). Effects of self-myofascial release: a systematic review. Journal of Bodywork and Movement Therapies, 19(4), 747–758.
- Behm, D. G., & Wilke, J. (2019). Do self-myofascial release devices release myofascia? Rolling mechanisms: a narrative review. Sports Medicine, 49(8), 1173–1181.
- Cheatham, S. W., Kolber, M. J., Cain, M., & Lee, M. (2015). The effects of self-myofascial release using a foam roll or roller massager on joint range of motion, muscle recovery, and performance: a systematic review. International Journal of Sports Physical Therapy, 10(6), 827–838.
- Halbertsma, J. P., van Bolhuis, A. I., & Göeken, L. N. (1996). Sport stretching: effect on passive muscle stiffness of short hamstrings. Archives of Physical Medicine and Rehabilitation, 77(7), 688–692.
- Winters, M. V., Blake, C. G., Trost, J. S., et al. (2004). Passive versus active stretching of hip flexor muscles in subjects with limited hip extension: a randomized clinical trial. Physical Therapy, 84(9), 800–807.
- Schleip, R., & Müller, D. G. (2013). Training principles for fascial connective tissues: scientific foundation and suggested practical applications. Journal of Bodywork and Movement Therapies, 17(1), 103–115.
- Stecco, C., Fede, C., Macchi, V., et al. (2018). The fasciacytes: a new cell devoted to fascial gliding regulation. Clinical Anatomy, 31(5), 667–676.
- Klingler, W., Velders, M., Hoppe, K., et al. (2014). Clinical relevance of fascial tissue and dysfunctions. Current Pain and Headache Reports, 18(8), 439.
- Filler, A. G. (2008). Piriformis and related entrapment syndromes: diagnosis and management. Neurosurgery Clinics of North America, 19(4), 609–622.
- Papadopoulos, E. C., & Khan, S. N. (2004). Piriformis syndrome and low back pain: a new classification and review of the literature. Orthopedic Clinics of North America, 35(1), 65–71.
- Nourbakhsh, M. R., & Arab, A. M. (2002). Relationship between mechanical factors and incidence of low back pain. Journal of Orthopaedic and Sports Physical Therapy, 32(9), 447–460.
Disclaimer: Always consult with a qualified healthcare professional before starting any new movement program, particularly if you have a history of sciatica, disc issues, hip surgery, pelvic floor issues, or any acute or severe pain. This article is educational and does not constitute medical advice.
Free 28-Day Fascia Reset Email Course
Get our Free 28-day email course series to help with 1 or 2 exercises per day to release your fascia. One short lesson per day. Two minutes to read each.

Terry Tateossian is a Menopause Lifestyle Medicine Coach, Certified Personal Trainer & Nutritionist and the Founder of THOR: The House of Rose, a wellness brand serving women over 40 through retreats, coaching, macro-nutrition and community. As 25-year founder and entrepreneur, Terry spent two and a half decades building and running successful start-up businesses, an experience that put her on the front line of founder burnout long before she could name it. After facing serious health challenges, early onset menopause, and emotional eating while running her agency and raising two children, Terry rebuilt her health in her 40s and lost more than 80 pounds through evidence-based nutrition, training, and mindset work. Today, she helps women get strong, improve confidence, support hormone health, and create a stronger second half of life. Terry has been featured in major media outlets and is available for podcasts, expert commentary, brand collaborations, and speaking engagements on midlife health, reinvention, emotional eating, menopause wellness, and strength training for longevity. Get her free macro calculator (her cookbook companion) to start your journey to back to health.