
 By Team THOR
Free 28-Day Fascia Reset Email Course
Get our Free 28-day email course series to help with 1 or 2 exercises per day to release your fascia. One short lesson per day. Two minutes to read each.
The 7 Best Standing Ab Exercises for Women Over 40 (No Floor Required)
Standing ab exercises are one of the most practical core-training options for women over 40. Crunches, sit-ups, and long planks may work well earlier in life, but neck strain, wrist pressure, pelvic floor stress, and the hassle of getting on and off the floor can make traditional core workouts harder to maintain in midlife.
Standing exercises remove many of those barriers. They train the same core muscles while improving balance, coordination, and the full-body control used in everyday movement. They also require little space and can be done in a hallway, bedroom, kitchen, or the corner of a gym.
This guide covers seven effective standing ab exercises, the muscles they target, proper form, and how to build them into a sustainable weekly routine.
I am Terry Tateossian, founder of The House of Rose and a certified lifestyle medicine coach who works with women in perimenopause, menopause, and post-menopause through coaching and nutrition-focused wellness retreats.
Important: Consult your healthcare provider before starting a new exercise program, especially if you have diastasis recti, pelvic organ prolapse, active back pain, or a history of abdominal or spinal surgery. Some exercises may require modification.
Why Are Standing Ab Exercises Ideal for Women Over 40?
Standing core work is not just a more comfortable alternative to floor exercises. It produces training effects that floor exercises cannot fully replicate, and it addresses several specific vulnerabilities of the midlife body.
- Neck and shoulder stress is reduced. Sit-ups and crunches load the neck in ways that many midlife women find intolerable, particularly women dealing with the forward head posture that decades of desk work has produced. Long planks similarly load the wrists and shoulders. Standing exercises eliminate these stress points.
- Pelvic floor pressure is managed. The pelvic floor changes throughout perimenopause and menopause become more sensitive to the intra-abdominal pressure spikes that traditional crunching produces. Standing core exercises generally distribute pressure more evenly and are less likely to worsen pelvic floor issues.
- Balance training is built in. Every standing exercise requires the whole-body coordination that keeps the body upright while the core is working. This dual-tasking (core work plus balance) produces the neuromuscular integration that catches you during a stumble, which floor exercises cannot train.
- Whole-body engagement is greater. Standing core exercises recruit the glutes, quadriceps, calves, and stabilizing muscles throughout the body in addition to the target abdominal muscles. This makes each exercise a more efficient use of training time.
- Real-world function translates directly. The core patterns trained standing (twisting, bending, resisting rotation, coordinating the upper and lower body) map directly onto the movements of daily life, including lifting groceries, getting into and out of a car, and reaching for something on a high shelf.
- Time efficiency is higher. A complete standing core workout of 15 to 20 minutes can produce more functional benefit than 30 to 45 minutes of floor-based work because of the compound engagement.
- Accessibility is dramatically better. Standing exercises work in almost any space. No floor mat required. No changing into workout clothes. No need to get down to and up from the floor. This accessibility is what allows the practice to become genuinely daily rather than occasional.
- Diastasis recti considerations. Women with diastasis recti (the abdominal separation common after pregnancy that can persist for years) often need to avoid traditional crunches that increase intra-abdominal pressure and stress the linea alba. Standing exercises are usually more appropriate for this population.
“The coaching clients who complete their weekly core work most consistently are almost always the ones doing standing exercises rather than floor-based routines. The barrier is not motivation. The barrier is the accumulated small resistance to lying on the floor multiple times a week. When you remove that barrier and give women a fifteen-minute standing routine they can do anywhere, adherence climbs dramatically. And within six weeks the functional results start showing up in ways that floor-based programs often do not produce. Better balance. Easier daily movement. Confidence in the body’s ability to handle unpredictable situations.”
Terry Tateossian, Founder of The House of Rose
Free 28-Day Fascia Reset Email Course
Get our Free 28-day email course series to help with 1 or 2 exercises per day to release your fascia. One short lesson per day. Two minutes to read each.
Which Muscles Does Standing Core Training Target?
The core includes several muscles that work together to stabilize the spine, control movement, and manage pressure throughout the trunk. Knowing what each muscle does makes it easier to choose exercises that support your specific goals.
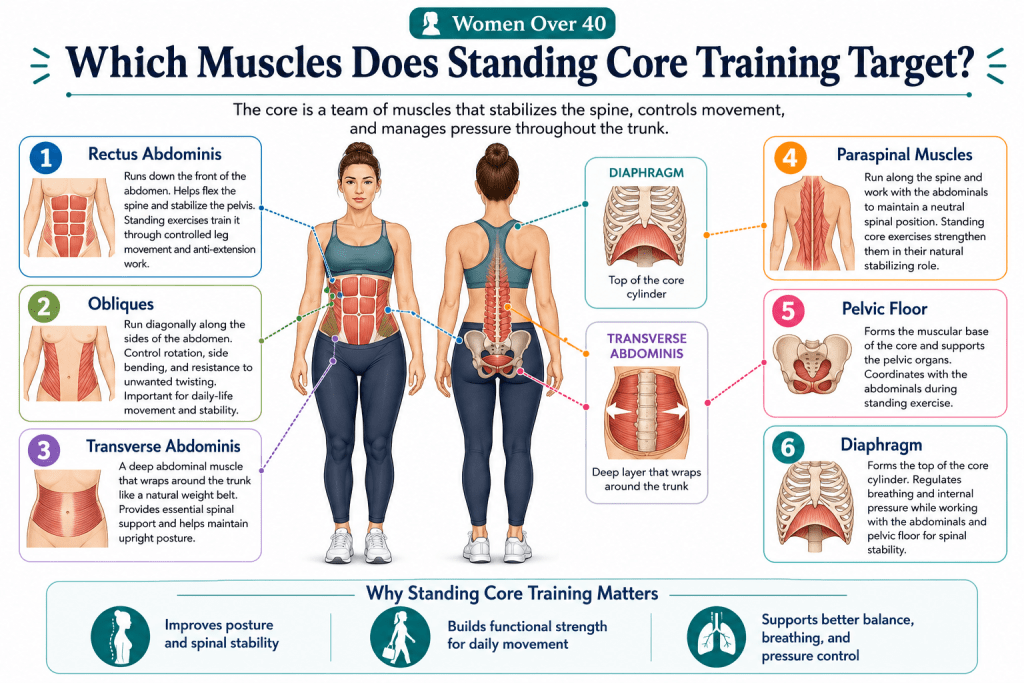
- Rectus Abdominis: This muscle runs vertically down the front of the abdomen and helps flex the spine and stabilize the pelvis. Standing exercises train it through controlled leg movements and anti-extension patterns that prevent the lower back from arching.
- Obliques: The internal and external obliques run diagonally along the sides of the abdomen and control rotation, side bending, and resistance to unwanted twisting. Standing exercises engage them during functional movements that closely reflect how the body rotates and stabilizes in daily life.
- Transverse Abdominis: This deep abdominal muscle wraps around the trunk like a natural weight belt and provides essential spinal support. It remains active during standing exercises because it must continuously stabilize the body and maintain upright posture.
- Paraspinal Muscles: These muscles run along the spine and work with the abdominals to maintain a neutral spinal position. Standing core exercises strengthen them through their natural stabilizing role rather than allowing them to relax against the floor.
- Pelvic Floor: The pelvic floor forms the muscular base of the core and supports the organs within the abdominal cavity. Standing exercises encourage it to coordinate with the abdominals while avoiding some of the pressure spikes created by traditional crunches.
- Diaphragm: The diaphragm forms the top of the core cylinder and regulates breathing and internal abdominal pressure. Coordinated breathing during standing exercises trains it to work with the abdominal muscles and pelvic floor to support spinal stability.
A well-designed standing core routine trains all six components together. This creates functional strength that supports posture, balance, lifting, walking, and other everyday movements.
What Does Research Say About Functional Core Training?
Core training research has changed significantly over the last two decades. Current findings generally support standing, functional exercises over isolated floor work for most healthy adults, especially during midlife and older age.
- Spinal Stability: Stuart McGill’s research found that the core’s ability to resist unwanted movement is more important for spinal health than raw abdominal strength alone. Anti-extension, anti-rotation, and anti-lateral-flexion exercises build this stability and can be trained effectively in a standing position.
- Functional Movement: Research involving older adults shows that exercises based on real-life positions and movement patterns produce better everyday outcomes than isolated muscle exercises. Standing core work prepares the body for walking, lifting, reaching, turning, and other daily activities.
- Fall Prevention: Core strength plays an important role in balance and fall prevention among older adults. Standing exercises train core stability, coordination, and balance together, making them more practical than strength work performed only on the floor.
- Pelvic Floor Support: Postpartum and pelvic health research has moved recommendations away from traditional crunches for women with diastasis recti or pelvic floor concerns. Standing and stability-focused exercises can strengthen the core while reducing unnecessary pressure through the abdomen and pelvic floor.
- Coordinated Breathing: Diaphragmatic breathing during core exercise supports better intra-abdominal pressure, spinal control, and pelvic floor coordination. Standing exercises often make it easier to connect breathing with natural posture and movement.
Overall, standing core training is a strong first-line approach for most midlife women. Floor-based exercises can still be useful, but they work best as a complement rather than the foundation of the routine.
Free 28-Day Fascia Reset Email Course
Get our Free 28-day email course series to help with 1 or 2 exercises per day to release your fascia. One short lesson per day. Two minutes to read each.
What Should You Know Before Starting?
Several principles apply to all seven standing ab exercises and are worth internalizing before starting.
- Neutral spine throughout: Maintain the natural curves of your spine during every exercise. Do not force yourself into flatness, and do not exaggerate the arch. Neutral is where the body handles load most safely.
- Diaphragmatic breathing: Breathe into the belly rather than the chest throughout the exercises. Generally exhale during the exertion phase of each rep and inhale during the return. Never hold your breath during core work.
- Braced but not clenched: The core should feel engaged (imagine bracing for a light punch to the abdomen) but not squeezed tight. Rigid clenching increases intra-abdominal pressure and stresses the pelvic floor and lower back. Gentle continuous engagement is the target.
- Feet in stable position: Most exercises are performed with feet hip-width apart. Some exercises use a staggered stance or single-leg position. Keep the weight distributed across the whole foot rather than shifting to the heels or the toes.
- Slow controlled movement: Every exercise is performed slowly with attention to form rather than fast for repetition count. Two to three seconds up, one to two second pause, two to three seconds down.
- Full range of motion: Move through the complete available range of each exercise rather than truncating the movement to squeeze in more reps.
- Progressive overload: Start with lighter weights or bodyweight versions and progress over weeks. The body adapts to what you consistently ask of it.
- Equipment needed: Most exercises require nothing. A few benefit from a light dumbbell (5 to 15 pounds), a resistance band, or a wall for stability. A total equipment investment of under $50 covers everything you need for the full seven-exercise routine.
- When to stop: Any exercise that produces sharp pain, joint discomfort, dizziness, or pelvic floor sensation should be stopped immediately. Modify the exercise or replace it with a different one that works for your body.
What Are the 7 Best Standing Ab Exercises for Women Over 40?
These 7 standing core exercises help strengthen the abs, hips, and lower back. They can also improve balance, posture, and control during everyday movement. Each exercise works the core in a slightly different way.
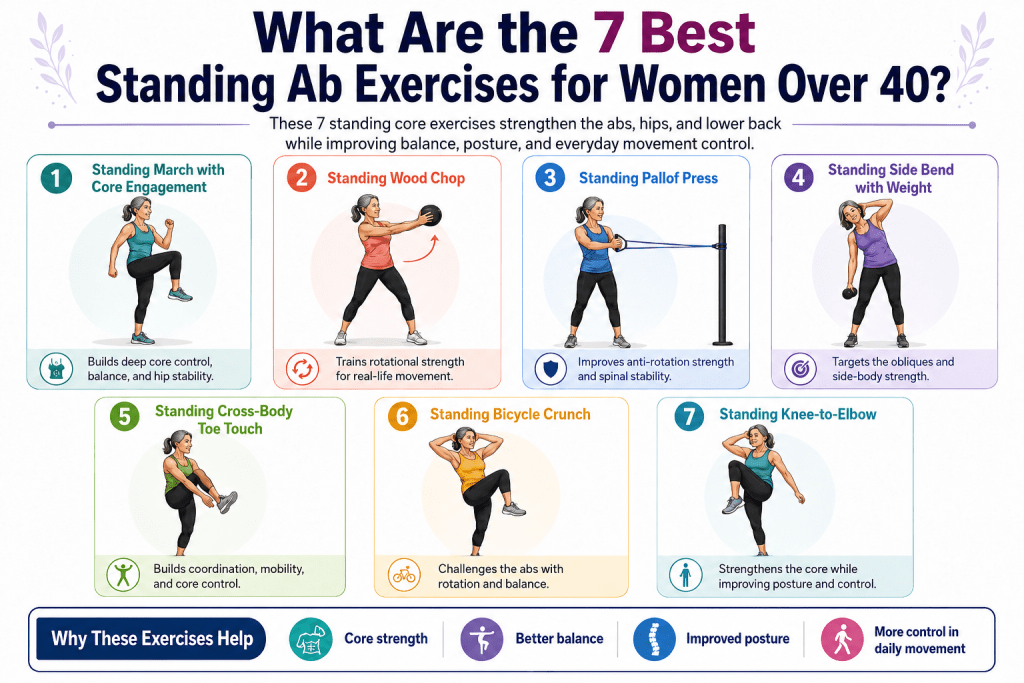
Exercise 1: The Standing March with Core Engagement
The standing march is the entry point to the practice. It trains the connection between the deep core and the hip flexors while building the neuromuscular pattern that every other exercise depends on.
- To begin, stand tall with your feet hip-width apart and your weight evenly balanced across both feet.
- Next, relax your shoulders and place your hands on your hips or bend your elbows as if you are walking.
- From this position, slowly lift your right knee toward your chest until your thigh is roughly parallel to the floor.
- Once your knee reaches the top, engage your core and hold the position for one second.
- Then, slowly lower your right foot back to the floor.
- Finally, repeat the same movement with your left leg. One march on each side counts as one repetition.
The standing march is a simple but effective exercise that strengthens the core while improving balance and hip control. The details below explain which muscles it works, how many repetitions to perform, and how to progress safely over time.
- Muscles targeted: Transverse abdominis, rectus abdominis, hip flexors, deep spinal stabilizers.
- Sets and reps: 3 sets of 12 to 15 marches per side.
- Common mistake to avoid: Leaning backward as the knee lifts. Keep the torso upright throughout the movement. If you cannot lift the knee high without leaning back, reduce the height of the knee lift.
- Why this exercise for midlife women: The connection between the hip flexors and the deep core weakens with prolonged sitting. This exercise directly rebuilds that connection.
- Progression: Once 3 sets of 15 per side feels easy, progress by adding an ankle weight (2 to 5 pounds), or by holding the lifted position for longer, or by combining the knee lift with an opposing arm drive.
Free 28-Day Fascia Reset Email Course
Get our Free 28-day email course series to help with 1 or 2 exercises per day to release your fascia. One short lesson per day. Two minutes to read each.
Exercise 2: The Standing Wood Chop
The wood chop is one of the most functional standing core exercises available. It trains rotational strength through diagonal patterns that map onto real-life movements like lifting a bag off the floor, twisting to grab a seatbelt, or picking up a grandchild.
- Stand with your feet hip-width apart.
- Hold a dumbbell weighing 5 to 15 pounds with both hands near your right hip.
- Extend your arms toward the floor while keeping a slight bend in your elbows.
- From this position, slowly move the dumbbell diagonally across your body and toward your left shoulder, as if chopping wood upward.
- Rotate through your trunk and pivot on your back foot as you reach across your body.
- Pause briefly at the top with your arms extended above your left shoulder.
- Slowly reverse the movement and return the dumbbell to your right hip.
- Complete all repetitions on one side before repeating the movement in the opposite direction. One full diagonal movement counts as one repetition.
The standing wood chop strengthens the core, hips, and shoulders while improving the rotational control needed for everyday movement. The details below cover the muscles involved, recommended sets and repetitions, common mistakes, and ways to progress safely.
- Muscles targeted: Obliques (internal and external), rectus abdominis, transverse abdominis, glutes, shoulders, and hips.
- Sets and reps: 3 sets of 8 to 12 repetitions per side.
- Common mistake to avoid: Using the arms to swing the weight rather than driving the rotation through the trunk. The arms are along for the ride. The rotation comes from the core.
- Why this exercise for midlife women: The diagonal rotational patterns of daily life are often untrained, and rotational core strength declines noticeably in midlife. This exercise addresses both.
- Progression: Start with a lighter weight (5 to 8 pounds) and progress the weight as the pattern feels stable. Advanced practitioners can add a slight squat at the bottom or a slight lunge to increase the whole-body demand.
Exercise 3: The Standing Pallof Press
The Pallof press trains anti-rotation, one of the most important core capacities and one that traditional core exercises rarely reach. Anti-rotation is what stabilizes the spine during any unpredictable movement, and it is one of the strongest predictors of low back pain resistance in midlife adults.
- Attach a resistance band to a stable anchor at chest height, such as a door frame, squat rack, or sturdy pole.
- Stand sideways to the anchor with your feet hip-width apart.
- Hold the band with both hands close to the center of your chest.
- Step sideways away from the anchor until you feel steady tension in the band.
- From this position, slowly press your hands straight out in front of your chest until your arms are fully extended.
- As the band pulls you toward the anchor, engage your core and keep your torso facing straight ahead.
- Pause with your arms extended for one to two seconds while resisting any rotation.
- Slowly bring your hands back toward your chest. This completes one repetition.
- Complete all repetitions on one side, then turn around and repeat the exercise on the opposite side.
The standing Pallof press builds deep core stability by teaching the body to resist unwanted rotation. The details below explain which muscles it targets, how to perform it effectively, and how to increase the challenge as your strength improves.
- Muscles targeted: Obliques (particularly the internal obliques), transverse abdominis, deep spinal stabilizers, hip stabilizers.
- Sets and reps: 3 sets of 8 to 12 repetitions per side.
- Common mistake to avoid: Rotating toward the anchor as the arms extend. The whole point of the exercise is to resist that rotation. If you cannot resist, step closer to the anchor to reduce the band tension.
- Why this exercise for midlife women: Anti-rotation strength is what protects the spine during the unpredictable rotational forces of daily life (twisting to look behind you, catching yourself as you slip, carrying an uneven load). It is one of the highest-impact core capacities for midlife women.
- Progression: Increase band tension by stepping further from the anchor or using a stiffer band. Hold the extended position longer. Perform the exercise in a slight split stance or lunge position for additional stability demand.
Free 28-Day Fascia Reset Email Course
Get our Free 28-day email course series to help with 1 or 2 exercises per day to release your fascia. One short lesson per day. Two minutes to read each.
Exercise 4: The Standing Side Bend with Weight
The side bend trains the lateral fascial line and the obliques through a direct pattern of lateral flexion. This exercise is often overlooked because it looks simple, but it produces significant functional benefit when done consistently.
- Stand tall with your feet hip-width apart and your weight evenly distributed.
- Hold a dumbbell weighing 5 to 15 pounds in your right hand, allowing your arm to hang naturally at your side.
- Place your left hand on your head or shoulder for stability, or let it hang at your side.
- Keep your chest and torso facing forward throughout the movement.
- Slowly bend toward your right side while lowering the dumbbell along the outside of your right leg.
- Avoid leaning forward, leaning backward, or rotating your torso. The movement should stay directly to the side.
- Pause at the bottom of the movement for one second.
- Engage your left obliques to slowly pull your torso back to the upright position. This completes one repetition.
- Complete all repetitions on the right side, then switch the dumbbell to your left hand and repeat on the opposite side.
The standing side bend strengthens the muscles along the sides of the core while improving control during lateral movement. The details below explain the muscles involved, recommended sets and repetitions, common mistakes, and ways to progress safely.
- Muscles targeted: Obliques (both internal and external), quadratus lumborum, lateral core.
- Sets and reps: 3 sets of 10 to 12 repetitions per side.
- Common mistake to avoid: Rotating the torso as you bend, which converts the exercise from a lateral flexion to a rotation. Keep the shoulders facing forward and the movement purely to the side.
- Why this exercise for midlife women: The lateral core and quadratus lumborum weaken with prolonged sitting and asymmetric daily loading (carrying bags on one shoulder, holding a child on one hip). Direct lateral training rebuilds this capacity.
- Progression: Increase weight gradually over weeks. Add a small pulse at the bottom of each repetition. Perform the exercise in a slight lunge position for additional demand.
Exercise 5: The Standing Cross-Body Toe Touch
The cross-body toe touch is a dynamic rotational exercise that trains coordination between the upper and lower body while also working the obliques and hip flexors. It is one of the most efficient exercises for building the diagonal patterns of core function.
- Stand tall with your feet slightly wider than hip-width apart.
- Extend both arms overhead in a wide Y position.
- From this position, lift your right leg out to the side and slightly forward.
- At the same time, rotate through your core and bring your left hand down toward your right foot.
- Touch your foot or reach as close to it as your flexibility comfortably allows.
- Next, return to the upright starting position with both arms extended overhead.
- Repeat the movement on the opposite side by lifting your left leg and reaching your right hand toward your left foot.
- One touch on each side counts as one repetition.
The standing cross-body toe touch strengthens the core and lower body while improving coordination, flexibility, and rotational control. The details below explain the muscles it targets, recommended repetitions, common mistakes, modifications, and ways to make the exercise more challenging.
- Muscles targeted: Obliques, rectus abdominis, hip flexors, hamstrings, calves.
- Sets and reps: 3 sets of 10 to 12 touches per side.
- Common mistake to avoid: Bending forward at the hips rather than rotating through the core. The reach comes from twisting, not from bowing.
- Why this exercise for midlife women: The dynamic coordination between the upper and lower body deteriorates with age. This exercise directly trains that coordination in a functional pattern.
- Modification for limited flexibility: If you cannot reach your foot, reach for your shin or knee instead. Progress toward the foot over weeks as flexibility improves.
- Progression: Add a light weight in each hand (2 to 5 pounds) once the pattern feels stable. Increase the pace slightly for a cardiovascular component. Perform in a slight lunge position.
Free 28-Day Fascia Reset Email Course
Get our Free 28-day email course series to help with 1 or 2 exercises per day to release your fascia. One short lesson per day. Two minutes to read each.
Exercise 6: The Standing Bicycle Crunch
The standing bicycle is a standing analog of the traditional floor bicycle crunch, delivering similar oblique training without the neck strain or floor requirement. It is one of the most versatile exercises in the standing core toolkit.
- Stand tall with your feet hip-width apart.
- Place your hands lightly behind your head or beside your ears, keeping your elbows pointed out to the sides.
- Slowly lift your right knee toward your chest.
- At the same time, rotate your torso and bring your left elbow toward your right knee.
- Focus on lifting the knee and rotating through your core. Your elbow and knee do not need to touch.
- Return to the upright starting position with control.
- Repeat the movement on the opposite side by lifting your left knee and bringing your right elbow toward it.
- One crunch on each side counts as one repetition.
The standing bicycle crunch strengthens the obliques and hip flexors while improving balance and rotational control. The details below explain the muscles it targets, recommended repetitions, common mistakes, and ways to increase the challenge safely.
- Muscles targeted: Obliques (primary), rectus abdominis, hip flexors.
- Sets and reps: 3 sets of 12 to 15 repetitions per side.
- Common mistake to avoid: Pulling on the head with the hands to increase the twist. The hands rest lightly on the head or ears. The rotation comes from the core, not from arm force.
- Why this exercise for midlife women: The standing bicycle produces the same oblique training as the floor version without the neck strain that makes floor bicycles unpleasant or unsafe for many midlife women.
- Progression: Slow the tempo further and add a two-second hold at the top of each rep. Add a light weight in each hand.
Exercise 7: The Standing Knee-to-Elbow
The standing knee-to-elbow finishes the routine with a direct hip-flexor and rectus abdominis pattern. It builds the strength that supports the lifted-leg motions of daily life (climbing stairs, stepping over curbs, getting into cars).
- Stand tall with your feet hip-width apart.
- Bend your arms to approximately 90 degrees, keeping your hands in loose fists near head height and your elbows pointed out to the sides.
- Slowly lift your right knee toward your chest.
- At the same time, bring your right elbow down toward your right knee.
- Allow your elbow and knee to meet around hip height and slightly in front of your body.
- Pause in this position for one second while keeping your core engaged.
- Slowly return to the upright starting position.
- Repeat the movement on the opposite side by bringing your left knee and left elbow together.
- One lift on each side counts as one repetition.
The standing knee-to-elbow strengthens the core and hip flexors while supporting the leg-lifting movements used in daily life. The details below explain the muscles it targets, recommended repetitions, common mistakes, and ways to increase the challenge safely.
- Muscles targeted: Rectus abdominis, hip flexors, obliques (secondary), quadriceps.
- Sets and reps: 3 sets of 10 to 15 repetitions per side.
- Common mistake to avoid: Leaning forward significantly to bring the elbow to the knee. Some slight forward crunch is fine, but the majority of the movement should come from the knee lifting to meet a relatively stable upper body.
- Why this exercise for midlife women: The pattern trained by this exercise directly maps to the daily-life movements that become harder in midlife (stepping up onto curbs, climbing stairs, getting out of low chairs). Training the pattern preserves the function.
- Progression: Add an ankle weight (2 to 5 pounds). Add a light dumbbell in each hand. Perform on a slightly unstable surface (a folded towel or thin balance pad) for additional demand.
Free 28-Day Fascia Reset Email Course
Get our Free 28-day email course series to help with 1 or 2 exercises per day to release your fascia. One short lesson per day. Two minutes to read each.
How Can You Build a Weekly Standing Core Routine?
The seven exercises can be arranged into a sustainable weekly routine in several ways.
The 15-minute daily routine is ideal for beginners or busy women who prefer a shorter session. Complete five of the seven exercises each day, rotating the two exercises you leave out so that all movements are covered throughout the week. Each session takes approximately 15 minutes and can be performed five to six days per week.
The full weekly program is recommended for most midlife women. It includes two dedicated core sessions per week that cover all seven exercises, along with one shorter maintenance session. Each full session takes approximately 20 to 25 minutes.
|
Day |
Session Focus |
Duration |
|
Monday |
Full 7-exercise routine |
25 min |
|
Tuesday |
45 to 60 min |
|
|
Wednesday |
Rest or gentle movement |
15 to 30 min |
|
Thursday |
Full 7-exercise routine |
25 min |
|
Friday |
Strength training |
45 to 60 min |
|
Saturday |
Shorter core maintenance (any 3 to 4 of the 7 exercises) |
15 min |
|
Sunday |
Rest or gentle movement |
15 to 30 min |
For women who already have a strength training routine, add 10 to 15 minutes of standing core work as a finisher to two of the weekly strength sessions. This produces meaningful core development without requiring separate core-only sessions.
Weeks 1 to 4 focus on learning the movement patterns and establishing consistency. Weeks 5 to 12 focus on progressive overload (adding weights, increasing reps, holding positions longer). By month 4 to 6, the standing core routine is fully installed as a background habit and produces the balance, functional strength, and postural benefits at their full magnitude.
“By week six of consistent standing core work, coaching clients start reporting the same things I hear at the retreat. They stand more upright without thinking about it. Their balance during transitions (getting out of a car, climbing stairs, reaching for things) feels different in a way they can describe. The low back tightness many of them had been living with quietly starts to fade. These are not aesthetic changes. They are functional changes that show up in daily life within a month and a half of consistent practice. That is the reward for showing up two or three times a week for fifteen to twenty-five minutes of standing core work.”
Terry Tateossian, Founder of The House of Rose
Which Mistakes Can Undermine Your Core Training?
These mistakes consistently reduce the effectiveness of standing core training for midlife women.
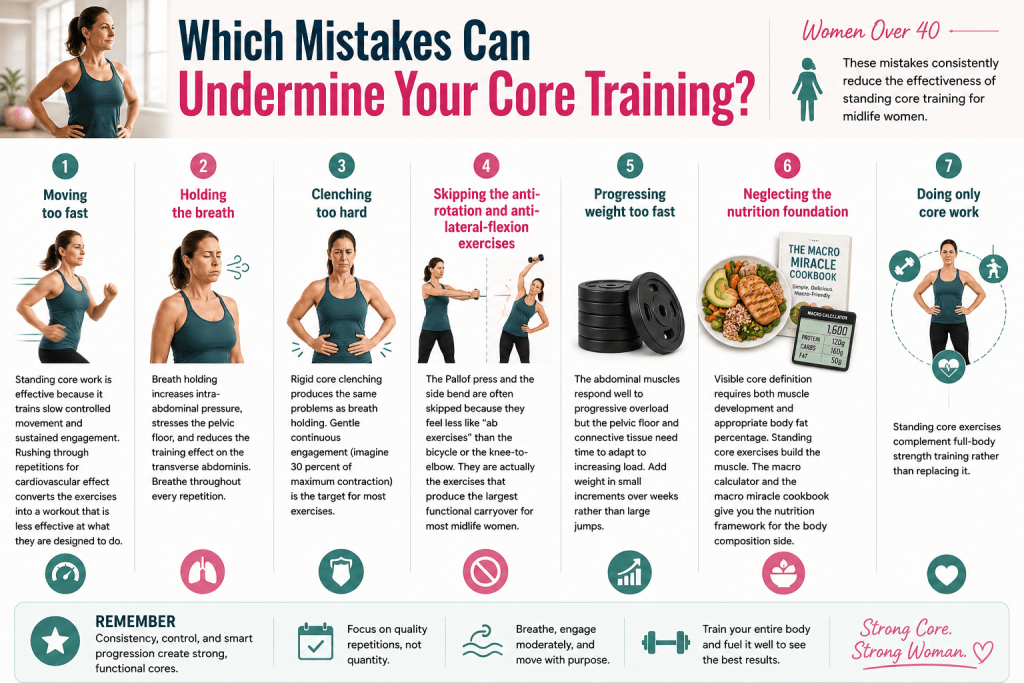
- Moving too fast: Standing core work is effective because it trains slow controlled movement and sustained engagement. Rushing through repetitions for cardiovascular effect converts the exercises into a workout that is less effective at what they are designed to do.
- Holding the breath: Breath holding increases intra-abdominal pressure, stresses the pelvic floor, and reduces the training effect on the transverse abdominis. Breathe throughout every repetition.
- Clenching too hard: Rigid core clenching produces the same problems as breath holding. Gentle continuous engagement (imagine 30 percent of maximum contraction) is the target for most exercises.
- Skipping the anti-rotation and anti-lateral-flexion exercises: The Pallof press and the side bend are often skipped because they feel less like “ab exercises” than the bicycle or the knee-to-elbow. They are actually the exercises that produce the largest functional carryover for most midlife women.
- Progressing weight too fast: The abdominal muscles respond well to progressive overload but the pelvic floor and connective tissue need time to adapt to increasing load. Add weight in small increments over weeks rather than large jumps.
- Neglecting the nutrition foundation: Visible core definition requires both muscle development and appropriate body fat percentage. Standing core exercises build the muscle. The macro calculator and the macro miracle cookbook give you the nutrition framework for the body composition side.
- Doing only core work: Standing core exercises complement full-body strength training rather than replacing it.
Free 28-Day Fascia Reset Email Course
Get our Free 28-day email course series to help with 1 or 2 exercises per day to release your fascia. One short lesson per day. Two minutes to read each.
How Does Standing Core Training Fit the THOR Framework?
Standing core training is one component of the five-part lifestyle medicine framework I teach at THOR.
- Nutrition: Adequate protein supports the muscle building that core training stimulates. The free Macro Calculator gives you your protein target. The Macro Miracle Mediterranean Cookbook is the kitchen-side companion.
- Daily movement: Standing core work is one component of the movement layer, alongside strength training, micro walks, and yin yoga.
- Sleep: Core recovery happens during sleep. Consistent sleep supports the adaptation that produces visible and functional core changes.
- Nervous system regulation: The breath coordination in standing core work is itself a parasympathetic activation practice. It pairs with the broader nervous system work covered in our parasympathetic aging article.
- Supplement foundation: Vitamin D, magnesium, omega-3, and adequate protein all support the connective tissue that core training develops. The foundational supplement collection covers the priorities.
For women who want sustained 1:1 support on the full framework including form review and personalized progression, the Monthly Personal Training and Nutrition Coaching Program is the primary CTA. For the immersive version, the Deeply Restorative Yoga and Nature Retreat at our Smoky Mountains property includes standing core work in the daily movement programming.
When Should You See a Healthcare Professional?
Most midlife women can complete the seven-exercise routine safely with appropriate modification. Some situations require professional evaluation first.
- Diastasis recti: Work with a pelvic floor physical therapist for individualized guidance on which exercises are appropriate and how to modify them.
- Pelvic organ prolapse: Same recommendation. Standing exercises are often more appropriate than floor exercises, but individualized guidance from a pelvic floor PT is important.
- Active lower back pain: Any acute back pain should be evaluated before starting a new core program.
- Recent abdominal or spinal surgery: Wait for surgical clearance before adding new core work.
- Osteoporosis: Some exercises may need modification to reduce spinal load.
- Balance concerns: Use a wall or countertop for stability, or work with a physical therapist to develop a program appropriate for your baseline.
Free 28-Day Fascia Reset Email Course
Get our Free 28-day email course series to help with 1 or 2 exercises per day to release your fascia. One short lesson per day. Two minutes to read each.
What Are Your Next Steps?
If the framework in this article resonates and you want to install standing core training into your routine, here are the four next steps in order of friction.
- Complete one full 25-minute session this week. Do not wait for perfect equipment or ideal conditions. Start with the bodyweight versions of every exercise using no equipment beyond a wall for stability if needed.
- Add a second session in week two. Twice-weekly practice is the target for meaningful adaptation.
- Build the nutrition foundation underneath. The free Macro Calculator gives you your personalized starting numbers.
- Consider personalized coaching. The Monthly Personal Training and Nutrition Coaching Program is where I work with midlife women on form review, progression, and integration with the broader framework. For the immersive version, the Deeply Restorative Yoga and Nature Retreat at our Smoky Mountains property installs the full framework in five days.
Frequently Asked Questions
Are standing ab exercises as effective as floor exercises?
Standing exercises produce different training effects than floor exercises. For most midlife women, standing exercises produce better functional outcomes because they train the whole-body coordination that daily-life movement requires. For pure muscle isolation, floor exercises can produce slightly stronger localized muscle activation. Most midlife women benefit more from the functional carryover of standing work.
How often should I do standing ab exercises?
Two to three sessions per week produces meaningful results. Daily practice is fine but not necessary. Two dedicated 20 to 25 minute sessions plus one shorter maintenance session per week is the target for most midlife women who want steady progress.
How long before I see results?
Functional improvements (better balance, easier daily movement, reduced low back tightness) typically show up within four to six weeks of consistent practice. Visible core definition, when combined with adequate protein intake and appropriate body composition work, becomes noticeable at three to six months.
Can I get visible abs from standing exercises alone?
Visible abdominal definition requires both muscle development and low enough body fat to see the muscle. Standing exercises build the muscle effectively. The body fat side comes from the nutrition foundation (adequate protein, appropriate calorie balance) and overall training program. Both pieces have to be in place for visible definition.
Are standing ab exercises safe during pregnancy?
Most standing core exercises can be modified for pregnancy, but the specific modifications depend on trimester and individual situation. Work with a prenatal-certified trainer or physical therapist for personalized guidance. Avoid deep rotational movements after the first trimester.
What if I have diastasis recti?
Standing exercises are generally more appropriate than floor crunches for women with diastasis recti, particularly the anti-rotation and anti-lateral-flexion exercises. Avoid exercises that produce visible abdominal doming during the movement. A pelvic floor physical therapist can provide personalized recommendations.
Free 28-Day Fascia Reset Email Course
Get our Free 28-day email course series to help with 1 or 2 exercises per day to release your fascia. One short lesson per day. Two minutes to read each.
Do I need any equipment?
Most exercises can be done with no equipment. A light dumbbell (5 to 15 pounds), a resistance band, and a wall for stability are helpful but not essential. Total equipment investment is under $50 for everything you need.
Can I do this workout every day?
Daily practice is safe and often beneficial once the pattern is established. The muscles recover quickly and can handle daily gentle work. For the first four weeks while learning the patterns, alternating days with rest days is a good approach.
What if I cannot balance well?
Start with the exercises that require the least balance (the standing march, the side bend, and the Pallof press with wall support). Progress to the more dynamic exercises as balance improves. Working near a wall or countertop for light support is always fine.
Are standing ab exercises appropriate for postpartum women?
Standing exercises are generally more appropriate than floor exercises for postpartum women, particularly during the first year after birth when the pelvic floor and abdominal wall are still healing. Work with a pelvic floor physical therapist for individualized postpartum recommendations. Avoid intense rotational work in the first six weeks postpartum.
How does this compare to Pilates or yoga for core work?
Pilates and yoga both include excellent core training. Standing ab exercises complement rather than replace these practices. Women who do Pilates or yoga regularly can add 10 to 15 minutes of standing core work as a supplement. Women who prefer a more concise stand-alone core practice can use standing exercises as their primary approach.
Can standing ab exercises help with lower back pain?
The anti-rotation and anti-lateral-flexion exercises in the seven-exercise routine (particularly the Pallof press and the side bend) are specifically supportive for spine health. Many women with chronic low back tightness see reduced symptoms within four to eight weeks of consistent practice. Any acute back pain should be evaluated by a healthcare provider before starting a new exercise program.
What about menopause belly fat?
Standing core exercises build core muscle but do not directly reduce abdominal fat. The visceral fat accumulation many midlife women experience during perimenopause and menopause responds better to the combination of adequate protein, strength training, sleep optimization, and stress management covered in our menopause diet plan article. Standing core work is part of the picture but is not the primary intervention for abdominal fat.
Do I need to warm up before standing ab exercises?
A brief warm-up of five to seven minutes of gentle movement (walking, light mobility work) before starting the routine is helpful, particularly in cooler weather or first thing in the morning. This does not need to be elaborate. Getting the body slightly warm and the joints moving is enough.
Free 28-Day Fascia Reset Email Course
Get our Free 28-day email course series to help with 1 or 2 exercises per day to release your fascia. One short lesson per day. Two minutes to read each.
How does this fit with strength training and cardio?
Standing core work complements both. A typical week for a midlife woman might include two strength training sessions targeting the four longevity muscle groups, two dedicated standing core sessions, daily walking including some micro walks, and one or two yin yoga sessions. This complete framework produces the strongest aging-well outcomes.
References
- McGill, S. (2015). Back Mechanic: The Step-by-Step McGill Method to Fix Back Pain. Backfitpro Inc.
- McGill, S. (2016). Ultimate Back Fitness and Performance (6th ed.). Backfitpro Inc.
- Behm, D. G., Drinkwater, E. J., Willardson, J. M., & Cowley, P. M. (2010). The use of instability to train the core musculature. Applied Physiology, Nutrition, and Metabolism, 35(1), 91–108.
- Hibbs, A. E., Thompson, K. G., French, D., et al. (2008). Optimizing performance by improving core stability and core strength. Sports Medicine, 38(12), 995–1008.
- Willson, J. D., Dougherty, C. P., Ireland, M. L., & Davis, I. M. (2005). Core stability and its relationship to lower extremity function and injury. Journal of the American Academy of Orthopaedic Surgeons, 13(5), 316–325.
- Kibler, W. B., Press, J., & Sciascia, A. (2006). The role of core stability in athletic function. Sports Medicine, 36(3), 189–198.
- Bø, K., Berghmans, B., Mørkved, S., & Van Kampen, M. (Eds.). (2015). Evidence-Based Physical Therapy for the Pelvic Floor: Bridging Science and Clinical Practice (2nd ed.). Churchill Livingstone.
- Sperstad, J. B., Tennfjord, M. K., Hilde, G., et al. (2016). Diastasis recti abdominis during pregnancy and 12 months after childbirth: prevalence, risk factors and report of lumbopelvic pain. British Journal of Sports Medicine, 50(17), 1092–1096.
- Hodges, P. W., & Richardson, C. A. (1996). Inefficient muscular stabilization of the lumbar spine associated with low back pain. A motor control evaluation of transversus abdominis. Spine, 21(22), 2640–2650.
- Panjabi, M. M. (2003). Clinical spinal instability and low back pain. Journal of Electromyography and Kinesiology, 13(4), 371–379.
- Maltais, M. L., Desroches, J., & Dionne, I. J. (2009). Changes in muscle mass and strength after menopause. Journal of Musculoskeletal and Neuronal Interactions, 9(4), 186–197.
- Sipilä, S., Törmäkangas, T., Sillanpää, E., et al. (2020). Muscle and bone mass in middle-aged women: role of menopausal status and physical activity. Journal of Cachexia, Sarcopenia and Muscle, 11(3), 698–709.
- Bauer, J., Biolo, G., Cederholm, T., et al. (2013). Evidence-based recommendations for optimal dietary protein intake in older people: a position paper from the PROT-AGE Study Group. Journal of the American Medical Directors Association, 14(8), 542–559.
- Boyle, N. B., Lawton, C., & Dye, L. (2017). The effects of magnesium supplementation on subjective anxiety and stress: a systematic review. Nutrients, 9(5), 429.
- Hopper, S. I., Murray, S. L., Ferrara, L. R., & Singleton, J. K. (2019). Effectiveness of diaphragmatic breathing for reducing physiological and psychological stress in adults. JBI Database of Systematic Reviews and Implementation Reports, 17(9), 1855–1876.
- Peterson, M. D., Rhea, M. R., Sen, A., & Gordon, P. M. (2010). Resistance exercise for muscular strength in older adults: a meta-analysis. Ageing Research Reviews, 9(3), 226–237.
- Fragala, M. S., Cadore, E. L., Dorgo, S., et al. (2019). Resistance training for older adults: position statement from the National Strength and Conditioning Association. Journal of Strength and Conditioning Research, 33(8), 2019–2052.
Disclaimer: Always consult with a healthcare professional before starting any new routines, programs, or nutrition plans to ensure you receive the best medical advice and strategy for your specific individual needs.
Free 28-Day Fascia Reset Email Course
Get our Free 28-day email course series to help with 1 or 2 exercises per day to release your fascia. One short lesson per day. Two minutes to read each.

Terry Tateossian is a Menopause Lifestyle Medicine Coach, Certified Personal Trainer & Nutritionist and the Founder of THOR: The House of Rose, a wellness brand serving women over 40 through retreats, coaching, macro-nutrition and community. As 25-year founder and entrepreneur, Terry spent two and a half decades building and running successful start-up businesses, an experience that put her on the front line of founder burnout long before she could name it. After facing serious health challenges, early onset menopause, and emotional eating while running her agency and raising two children, Terry rebuilt her health in her 40s and lost more than 80 pounds through evidence-based nutrition, training, and mindset work. Today, she helps women get strong, improve confidence, support hormone health, and create a stronger second half of life. Terry has been featured in major media outlets and is available for podcasts, expert commentary, brand collaborations, and speaking engagements on midlife health, reinvention, emotional eating, menopause wellness, and strength training for longevity. Get her free macro calculator (her cookbook companion) to start your journey to back to health.