
 By Team THOR
Free 28-Day Fascia Reset Email Course
Get our Free 28-day email course series to help with 1 or 2 exercises per day to release your fascia. One short lesson per day. Two minutes to read each.
5 Myofascial Release Exercises for Tight Psoas for Women Over 40 (Plus a 5-Day Release Program With Videos)
Exercises for a tight psoas are one of the most useful and overlooked movement practices for women over 40. The psoas connects the lower spine to the thigh and plays a major role in hip movement, posture, and stability. Because it shortens during prolonged sitting, decades of daily sitting can leave it chronically restricted by the time perimenopause and menopause begin.
A tight psoas can contribute to low back pain, pelvic tilt, shallow breathing, poor posture, and deep hip tension that is difficult to locate. Standard stretching does not always reach it effectively, which is why a more targeted approach is often needed.
This guide includes five exercises that address the psoas through passive release, active stretching, mobility, myofascial work, and functional movement. It also includes a five-day program that takes 10 to 20 minutes a day, with video placement notes for each exercise.
I am Terry Tateossian, founder of The House of Rose and a certified lifestyle medicine coach who runs nutrition-focused wellness retreats for women in perimenopause, menopause, and post-menopause. Psoas restriction is one of the most common movement issues I see in retreat guests, and this program reflects the practices we use to help them continue their progress at home.
Important: Consult your healthcare provider before beginning psoas work if you have a history of back injury, hip surgery, pelvic floor problems, hernia, pregnancy, or unexplained acute pain. Stop immediately if an exercise causes sharp, radiating, or low back pain.
What Is the Psoas and Why Does It Matter?
The psoas major (usually just called the psoas) is a long, deep muscle that runs from the vertebrae of the lower spine down through the pelvis and attaches to the top of the femur (thigh bone). Along with the iliacus muscle, which lines the inner bowl of the pelvis, the two together form what is often called the iliopsoas. When most people say psoas, they usually mean the iliopsoas group.
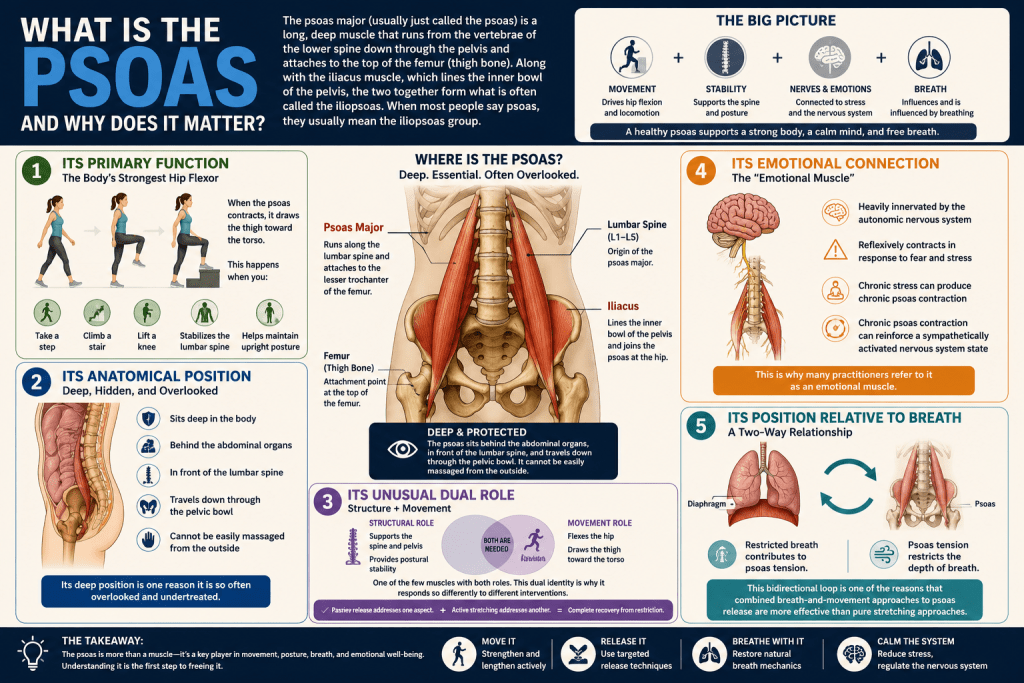
- Its primary function: The psoas is the strongest hip flexor in the body. When it contracts, it draws the thigh toward the torso, which is what happens when you lift a knee, climb a stair, or take a step forward. It also stabilizes the lumbar spine and plays a role in maintaining upright posture.
- Its anatomical position: The psoas sits deep in the body. It cannot be easily massaged from the outside. It is behind the abdominal organs, in front of the lumbar spine, and travels down through the pelvic bowl. This deep position is one of the reasons it is so often overlooked and undertreated.
- Its unusual dual role: The psoas is one of only a small number of muscles that has both a structural role (supporting the spine and pelvis) and a movement role (flexing the hip). This dual identity is part of why it responds so differently to different interventions. Passive release addresses one aspect of it. Active stretching addresses another. Both are needed for a complete recovery from restriction.
- Its emotional connection: The psoas is heavily innervated by the autonomic nervous system and is one of the muscles that reflexively contracts in response to fear and stress. This connection between the psoas and the nervous system is why some practitioners refer to it as an emotional muscle. Chronic stress can produce chronic psoas contraction, and chronic psoas contraction can reinforce a sympathetically activated nervous system state.
- Its position relative to breath: The diaphragm and the psoas share fascial connections and functional relationships. Restricted breath contributes to psoas tension. Psoas tension restricts the depth of breath. This bidirectional loop is one of the reasons that combined breath-and-movement approaches to psoas release are more effective than pure stretching approaches.
Free 28-Day Fascia Reset Email Course
Get our Free 28-day email course series to help with 1 or 2 exercises per day to release your fascia. One short lesson per day. Two minutes to read each.
Why Does the Psoas Tighten in Midlife Women?
Psoas restriction is common at every stage of adult life, and it becomes particularly common and particularly consequential in midlife women. Several factors converge to make the psoas one of the most restricted muscles in the perimenopause and menopause window.
- Decades of prolonged sitting: Every hour spent seated is an hour in which the psoas is held in a shortened position. For most professional women, this adds up to six to ten hours per day for twenty or thirty years by the time perimenopause arrives. Muscles adapt to the position they spend the most time in, and the psoas has spent most of its life short.
- Cortisol elevation and sympathetic tone: The stress of midlife life, combined with the cortisol dysregulation of perimenopause and menopause, keeps the sympathetic nervous system chronically activated. Because the psoas contracts reflexively with nervous system activation, chronic stress produces chronic psoas contraction.
- Hormonal changes affect fascia and connective tissue: Declining estrogen changes the composition and behavior of fascia and connective tissue in ways that generally make them stiffer and less pliable. The psoas, which is surrounded by dense fascia, becomes harder to release with the same interventions that worked in younger years.
- Less Sleep prevents recovery: The nightly repair that keeps the psoas from accumulating restriction depends on adequate deep sleep, which is often disrupted in the perimenopause and menopause window. Poor sleep means restriction accumulates faster than it releases.
- Pelvic floor changes: The pelvic floor and the psoas are functionally connected, and the changes in pelvic floor tone that many women experience in midlife feed back into psoas tension patterns.
- Reduced whole-body movement: Most midlife women move less than they did in their twenties and thirties. Less overall movement means fewer opportunities for the psoas to be taken through its full range of motion, which allows it to adapt to a progressively narrower range.
- Historic core work patterns: The generation of women who grew up doing traditional sit-ups and crunches often overtrained the psoas as part of the core work of the 1990s and early 2000s. This decades-long overuse pattern layers on top of the sitting pattern to produce particularly stubborn psoas restriction in women now in their forties and fifties.
- The compensatory pattern: Once the psoas is restricted, the body compensates by borrowing motion from the lumbar spine. This produces the arched lower back, tucked pelvis, or tilted pelvic pattern that many midlife women recognize in themselves. The compensatory pattern reinforces the restriction, which reinforces the compensation.
“The psoas is where I see the most retreat guests have their body-based aha moment during the week. They arrive with low back pain they have been managing for years, or with a sense of hip tension they cannot quite locate, or with a general body stiffness they thought was just aging. By the third day of daily psoas release work, most of them can feel the difference physically. By the fifth day, many of them describe standing taller, breathing deeper, and moving with a lightness they had forgotten was available. This is not because the psoas is a magic muscle. It is because it is the specific muscle that most midlife women’s bodies have been asking for attention on for years without getting it. When you finally address it, the whole body responds.”
Terry Tateossian, Founder of The House of Rose
What Are the Signs of a Restricted Psoas?
Not every hip issue is a psoas issue, but the pattern of signs below often indicates chronic psoas restriction and suggests that a targeted release program would produce meaningful benefit.
The clearest signs include chronic low back pain or tightness particularly in the lumbar region, deep hip tension that does not resolve with standard hip stretches, an anterior pelvic tilt (the lower back arches noticeably when standing relaxed), difficulty standing tall without effort, tightness in the front of the hip when climbing stairs, discomfort or pinching in the front of the hip when squatting deep, shortened stride when walking, an inability to fully extend the hip behind the body, restricted breath depth particularly on the inhale, and a general sense of feeling stuck or braced in the body. Any three or four of these together is a reasonable signal to begin a targeted psoas release program.
- A simple self-test: Lie on your back with both legs extended straight. If your lower back cannot rest flat on the floor without effort, and if pulling one knee to your chest causes the opposite leg to lift off the floor, both patterns suggest psoas restriction. The specific test is called the modified Thomas test in clinical practice, and it is one of the standard clinical screens for iliopsoas tightness.
- What normal versus restricted feels like: A healthy psoas allows the leg to swing freely behind the body during walking, allows the lower back to rest flat when lying down, and does not restrict deep breathing. When these functional patterns are absent, the psoas is a reasonable suspect.
Free 28-Day Fascia Reset Email Course
Get our Free 28-day email course series to help with 1 or 2 exercises per day to release your fascia. One short lesson per day. Two minutes to read each.
What Does Research Show About Psoas Function?
The clinical and research literature on the psoas has grown substantially over the last two decades. The current picture supports targeted psoas work as an effective intervention for a specific cluster of common midlife issues.
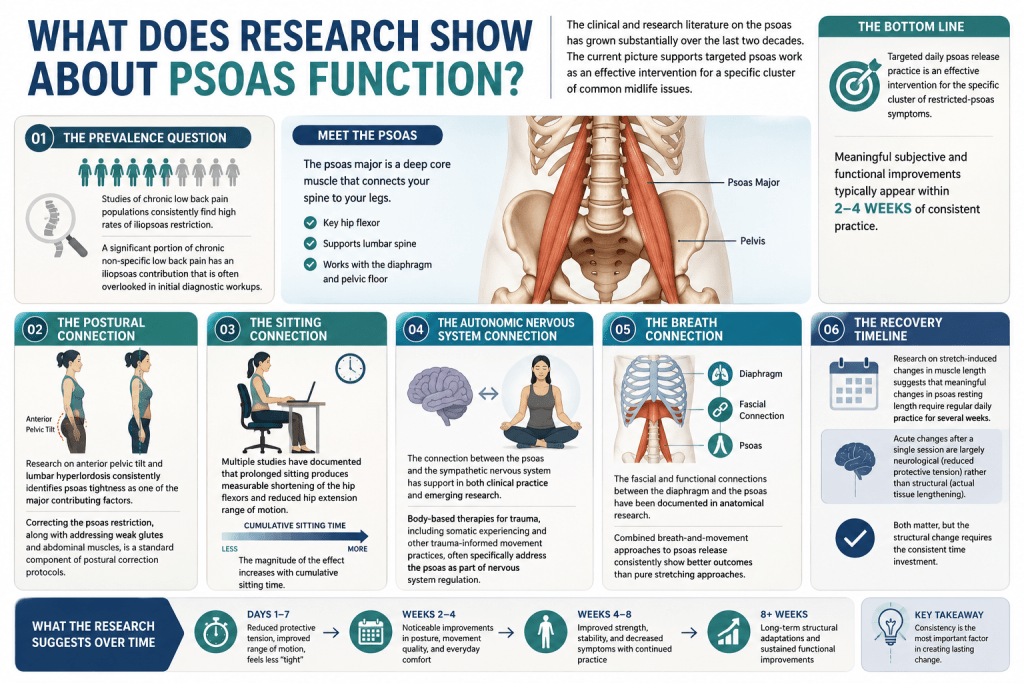
- The prevalence question: Studies of chronic low back pain populations consistently find high rates of iliopsoas restriction. Some estimates suggest that a significant portion of chronic non-specific low back pain has an iliopsoas contribution that is often overlooked in initial diagnostic workups.
- The postural connection: Research on anterior pelvic tilt and lumbar hyperlordosis consistently identifies psoas tightness as one of the major contributing factors. Correcting the psoas restriction, along with addressing weak glutes and abdominal muscles, is one of the standard components of postural correction protocols.
- The sitting connection: Multiple studies have documented that prolonged sitting produces measurable shortening of the hip flexors and reduced hip extension range of motion. The magnitude of the effect increases with cumulative sitting time.
- The autonomic nervous system connection: The connection between the psoas and the sympathetic nervous system has support in both clinical practice and emerging research. Body-based therapies for trauma, including somatic experiencing and other trauma-informed movement practices, often specifically address the psoas as part of nervous system regulation.
- The breath connection: The fascial and functional connections between the diaphragm and the psoas have been documented in anatomical research. Combined breath-and-movement approaches to psoas release consistently show better outcomes than pure stretching approaches.
- The recovery timeline: Research on stretch-induced changes in muscle length suggests that meaningful changes in psoas resting length require regular daily practice for several weeks. Acute changes after a single session are largely neurological (reduced protective tension) rather than structural (actual tissue lengthening). Both matter, but the structural change requires the consistent time investment.
The overall picture supports targeted daily psoas release practice as an effective intervention for the specific cluster of restricted-psoas symptoms, with meaningful subjective and functional improvements typically appearing within two to four weeks of consistent practice.
What Should You Know Before Starting?
Several principles apply to all five exercises in this article and are worth internalizing before beginning.
- Breath is not optional: Every psoas release exercise is significantly more effective when combined with slow, deep, diaphragmatic breathing. Do not hold your breath during any of these practices. Extended exhalation in particular helps the muscle release.
- Slow is the direction: The psoas responds to sustained, gentle release rather than to forceful stretching. Never force any of these positions. Ease into each exercise and hold it for the recommended duration.
- Comfort matters: Use props (pillows, folded blankets, a yoga bolster) generously. If a position produces pain or forcing, modify it. The whole point of psoas release is to signal safety to a muscle that is chronically contracted from stress and holding.
- Consistency beats intensity: Ten minutes a day for two weeks produces more psoas release than one 45-minute session per week. Build a daily practice you can sustain.
- Never stretch into pain: Any sharp pain, radiating pain, or pain in the low back is a signal to stop. Discomfort at the front of the hip during a stretch is normal. Pain in the lower back is not.
- Warm up briefly: Two or three minutes of gentle walking or hip circles before the practice makes the release more effective. Cold psoas releases less than warm psoas.
- Equipment needed: A yoga mat or comfortable surface, a folded blanket or small pillow, and a therapy ball or tennis ball for Exercise 4. Total investment under $30 for everything.
- Time of day: Psoas release can be practiced any time. Morning practice supports the day. Evening practice supports sleep. Middle-of-the-day practice interrupts the sitting accumulation.
Free 28-Day Fascia Reset Email Course
Get our Free 28-day email course series to help with 1 or 2 exercises per day to release your fascia. One short lesson per day. Two minutes to read each.
What Are the 5 Best Psoas Release Exercises?
These five psoas release exercises combine passive relaxation, gentle stretching, targeted pressure, and functional movement to reduce deep hip tension and improve mobility. The sequence begins with the accessible Constructive Rest Position before progressing to more active techniques, allowing you to choose the exercises that match your comfort level, flexibility, and daily routine.
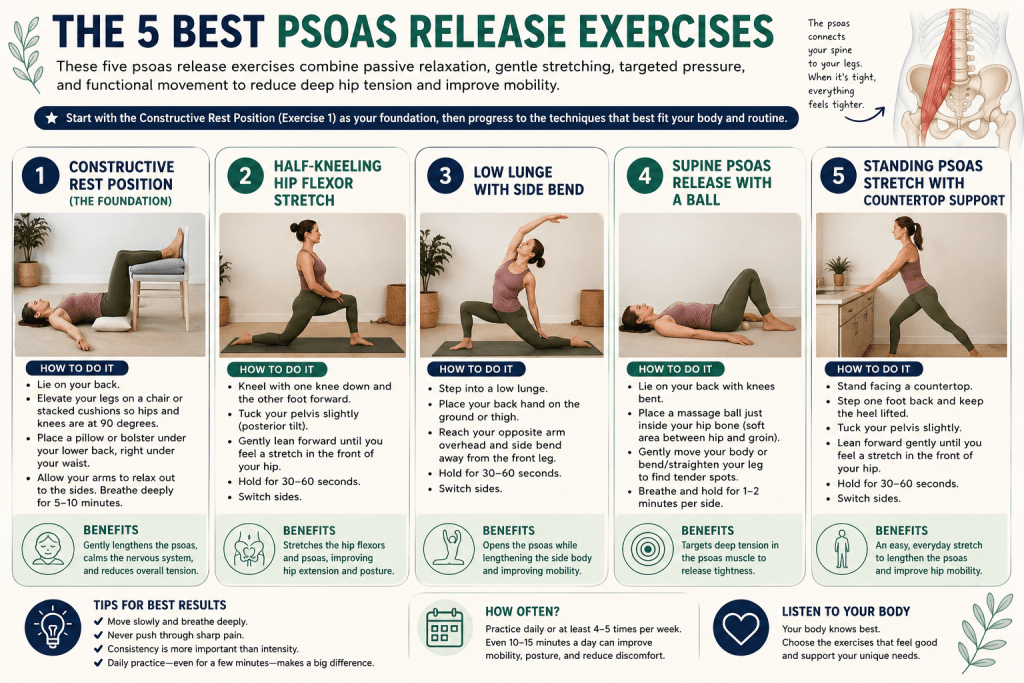
Exercise 1: Constructive Rest Position (The Foundation)
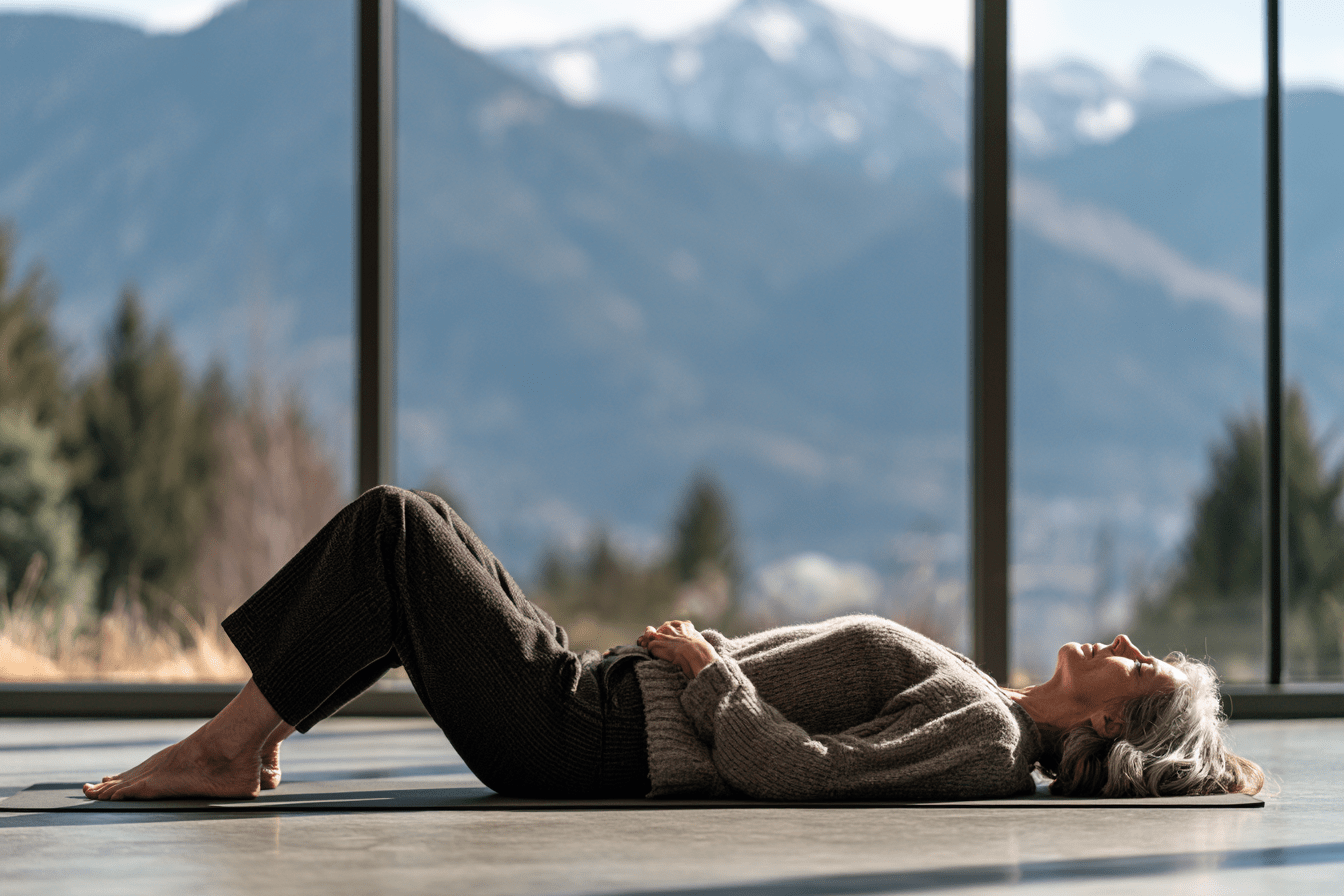
The Constructive Rest Position is the foundational psoas release. It looks like doing nothing. It is one of the most effective single interventions available for chronic psoas restriction because it allows the muscle to release passively without any active stretching that could trigger a protective response.
- How it works: When you lie on your back with your knees bent and your feet flat, the psoas is placed in its shortest and most rested position. The nervous system reads this as safety, and the muscle gradually releases its chronic protective tension. Combined with slow diaphragmatic breathing, the effect is significantly amplified.
- Setup: Lie on your back on a comfortable surface. Bend both knees and place the feet flat on the floor, roughly hip-width apart. Your knees can either rest against each other or against opposite thighs if you want extra support. Rest your hands on your belly or beside your body. Use a small folded blanket under your head if your neck feels strained.
- Execution: Once in position, focus on slow diaphragmatic breathing. Feel your belly rise on the inhale and soften on the exhale. Extend the exhalation slightly longer than the inhalation. Rest in the position for eight to twenty minutes. The longer, the better, up to about twenty minutes.
- Common mistakes: Rushing the practice by cutting the duration short. Holding tension in the shoulders, jaw, or belly during the position. Falling asleep is fine and does not undermine the practice.
- Why this exercise for midlife women: Constructive Rest Position is safe for almost every midlife body, requires no equipment, produces significant subjective release, and functions equally well as a nervous system reset. It is the single most accessible and most effective psoas practice for women who have not done this work before.
- Modification for lower back pain: Place a small folded blanket under the hips if the lower back feels strained. This slight elevation reduces any pull on the lumbar spine.
Exercise 2: Half-Kneeling Hip Flexor Stretch
The Half-Kneeling Hip Flexor Stretch is one of the most effective active stretches for the psoas. It isolates the hip flexor of the back leg while stabilizing the pelvis, which allows for direct targeted lengthening of the psoas without recruiting compensatory movements.
- How it works: The half-kneeling position places the hip of the back leg into extension, which lengthens the psoas. The forward pelvic tilt cue (tuck the tailbone slightly) increases the stretch specifically at the psoas rather than at the front of the thigh.
- Setup: Start on all fours. Bring the right foot forward into a lunge position with the right knee directly over the right ankle. The left knee remains on the floor with the top of the left foot flat. Use a folded blanket or pillow under the back knee for comfort.
- Execution: Tuck the tailbone slightly under (posterior pelvic tilt). Engage the glute of the back leg gently. You should feel a stretch in the front of the left hip and thigh. Hold for 60 to 90 seconds while breathing slowly. Switch sides.
- Sets and reps: 2 to 3 rounds per side.
- Common mistakes: Failing to tuck the tailbone (which shifts the stretch away from the psoas and into the quadriceps), leaning too far forward (which reduces the stretch), holding tension in the shoulders, holding the breath.
- Why this exercise for midlife women: This stretch produces one of the most reliable subjective releases at the psoas specifically. Most women feel a distinct pull deep in the front of the hip that they can identify as the target muscle. Regular practice produces measurable improvements in hip extension range of motion within two to three weeks.
- Progression: Add an overhead reach with the same-side arm as the back leg (right arm up when the right leg is back) to deepen the stretch through the fascial line. Advanced practitioners can also add a slight side bend away from the back leg for additional length through the quadratus lumborum.
Free 28-Day Fascia Reset Email Course
Get our Free 28-day email course series to help with 1 or 2 exercises per day to release your fascia. One short lesson per day. Two minutes to read each.
Exercise 3: Low Lunge With Side Bend
The Low Lunge With Side Bend (called Anjaneyasana with a lateral variation in yoga) opens the psoas along with the entire front fascial line, addressing the psoas within its functional context rather than in isolation.
- How it works: The deep low lunge position places the back-leg hip into significant extension while allowing the pelvis to sink downward. The side bend adds an oblique stretch through the quadratus lumborum and the side fascial line, which shares connections with the psoas.
- Setup: Start on all fours. Bring the right foot forward between your hands. Lower the left knee to the floor and slide the left leg back until the front of the left thigh is on or close to the floor. Place a folded blanket under the back knee for comfort. Sink the hips forward and down.
- Execution: Bring the arms overhead in a shape you can hold, hands together or apart. Take one full breath in the neutral position. On an exhalation, bend gently to the right (toward the front leg side), reaching the left arm up and over. Hold for 30 to 45 seconds. Return to center. Repeat on the other side by bending toward the left, reaching the right arm up and over. Hold for another 30 to 45 seconds. Come to standing. Switch legs and repeat the whole sequence.
- Sets and reps: 2 rounds per side (each round includes both side bends).
- Common mistakes: Collapsing into the low back rather than lengthening the spine, bending too far and losing the psoas stretch, holding the breath, letting the back knee slide out of alignment.
- Why this exercise for midlife women: This variation opens the psoas along with the quadratus lumborum and the lateral fascial line, addressing multiple restricted areas at once. Most midlife women feel a strong stretch through the deep hip and side body that continues to release with each breath.
- Modification for tight hips: If the low lunge position is too intense, keep the back knee more elevated by not sliding the back leg as far back. Reduce the depth of the side bend.
Exercise 4: Supine Psoas Release With a Ball
The Supine Psoas Release with a Ball uses gentle mechanical pressure on the muscle to produce release through the myofascial system. This is a more targeted intervention than pure stretching and can produce dramatic subjective release, particularly for stubbornly restricted psoas.
- Safety note: This exercise applies pressure to an area that sits close to the abdominal organs and major blood vessels. It should always be gentle. Never apply hard pressure. Anyone with abdominal aortic issues, hernia, pregnancy, recent abdominal surgery, or any acute abdominal condition should skip this exercise entirely.
- How it works: Gentle sustained pressure on the belly of the psoas muscle produces a release response through the myofascial system and the local nervous system. The prone position uses body weight to provide the pressure without requiring active work.
- Setup: You need a therapy ball, tennis ball, or lacrosse ball. Softer balls are better for beginners. A rolled-up towel is a good alternative if a ball is too intense.
- Execution: Lie face down on a comfortable surface. Place the ball on the floor and position it approximately two inches to the right of your belly button, just below the level of your navel. Slowly lower your body onto the ball. Support some weight with your arms. Do not put full body weight onto the ball. Breathe deeply into the belly. Hold the position for 60 to 90 seconds. Come off the ball slowly. Switch to the other side.
- Sets and reps: 1 or 2 rounds per side.
- Common mistakes: Using too hard a ball, applying too much pressure, holding the breath, placing the ball too close to the belly button (which puts pressure on the aorta) or too far to the side (which misses the muscle).
- Why this exercise for midlife women: This is the most targeted psoas intervention in the sequence and often produces the most dramatic subjective release when done correctly. Many women feel a distinct softening in the deep hip and a noticeable improvement in low back tension immediately after this practice.
- Modification: If prone position is uncomfortable, this can be done seated leaning forward onto a ball placed at the desk. The pressure is less but the mechanism is similar.
- When to skip this exercise: Pregnancy, hernia, recent abdominal surgery, known abdominal aortic aneurysm, active abdominal pain, or any acute concern about the abdominal area. When in doubt, skip this exercise and rely on the other four.
Free 28-Day Fascia Reset Email Course
Get our Free 28-day email course series to help with 1 or 2 exercises per day to release your fascia. One short lesson per day. Two minutes to read each.
Exercise 5: Standing Psoas Stretch With Countertop Support
The Standing Psoas Stretch is the functional integration exercise for the series. It addresses the psoas in an upright position, which is closer to how the muscle is used in real-life movement, and it can be done during a work break in less than five minutes.
- How it works: The standing position with the back leg extended places the psoas into a functional lengthened position while the upright torso remains available for breath and posture work. The countertop support provides balance so the muscle can release without the body needing to hold tension for balance.
- Setup: Stand facing a countertop, sturdy chair back, or wall. Place both hands lightly on the surface for balance.
- Execution: Step the right foot forward into a mini-lunge, keeping the right knee slightly bent. Extend the left leg straight back with the left foot flat on the floor, heel down. Tuck the tailbone slightly. Engage the left glute. Lean slightly forward from the front hip while keeping the torso upright. Hold for 60 to 90 seconds while breathing deeply. Switch legs.
- Sets and reps: 2 rounds per side.
- Common mistakes: Allowing the back heel to lift off the floor (which reduces the psoas stretch), collapsing the low back, holding tension in the shoulders, forgetting to engage the glute of the back leg.
- Why this exercise for midlife women: This is the exercise that most easily fits into a daily work life because it can be done at any countertop or desk. Practicing it as a two-minute break every couple of hours throughout the day interrupts the sitting-driven psoas shortening pattern in real time.
- Progression: Add an overhead reach with the same-side arm as the back leg. Add a slight forward lean while keeping the tailbone tucked to intensify the stretch.
How Does the 5-Day Psoas Release Program Work?
The five exercises above form the core of the release practice. The 5-day program combines them into a structured progressive sequence designed to produce meaningful psoas release within one week. Total time commitment per day ranges from 15 to 25 minutes.
Day 1: Foundation (15 minutes)
The first day establishes the foundation with the most accessible practice.
|
Exercise |
Duration |
|
Warm-up (walk in place, gentle hip circles) |
3 min |
|
Constructive Rest Position with deep breathing |
12 min |
Day 1 is deliberately simple. The purpose is to allow the nervous system to begin releasing chronic protective tension in the psoas without introducing any active stretching that might produce a protective response.
Free 28-Day Fascia Reset Email Course
Get our Free 28-day email course series to help with 1 or 2 exercises per day to release your fascia. One short lesson per day. Two minutes to read each.
Day 2: Add Active Stretch (20 minutes)
The second day adds the first active stretch and adds a short repeat of the foundation.
|
Exercise |
Duration |
|
Warm-up |
3 min |
|
Constructive Rest Position |
8 min |
|
Half-Kneeling Hip Flexor Stretch, both sides |
6 min |
|
Constructive Rest Position (close) |
3 min |
Day 3: Add Dynamic Release (22 minutes)
The third day adds the low lunge for a deeper functional stretch.
|
Exercise |
Duration |
|
Warm-up |
3 min |
|
Constructive Rest Position |
6 min |
|
Half-Kneeling Hip Flexor Stretch, both sides |
5 min |
|
Low Lunge with Side Bend, both sides |
6 min |
|
Constructive Rest Position (close) |
2 min |
Day 4: Add Myofascial Work (25 minutes)
The fourth day adds the targeted myofascial release, which often produces the most dramatic single-day change in the week.
|
Exercise |
Duration |
|
Warm-up |
3 min |
|
Constructive Rest Position |
5 min |
|
Half-Kneeling Hip Flexor Stretch, both sides |
5 min |
|
Low Lunge with Side Bend, both sides |
5 min |
|
Supine Psoas Release with Ball, both sides |
5 min |
|
Constructive Rest Position (close) |
2 min |
Day 5: Full Integration (25 minutes)
The fifth day integrates all five exercises into the complete sequence.
|
Exercise |
Duration |
|
Warm-up |
3 min |
|
Constructive Rest Position |
4 min |
|
Half-Kneeling Hip Flexor Stretch, both sides |
5 min |
|
Low Lunge with Side Bend, both sides |
5 min |
|
Supine Psoas Release with Ball, both sides |
5 min |
|
Standing Psoas Stretch with Countertop, both sides |
3 min |
Free 28-Day Fascia Reset Email Course
Get our Free 28-day email course series to help with 1 or 2 exercises per day to release your fascia. One short lesson per day. Two minutes to read each.
What Should You Do After the 5-Day Program?
The first five days establish the pattern. From day six forward, the most effective practice is a shorter daily sequence of Constructive Rest Position (5 to 8 minutes) plus one or two active stretches (5 to 8 minutes), totaling 10 to 15 minutes daily. Once a week, repeat the full Day 5 sequence for a deeper integration. This maintenance practice produces sustained psoas health and prevents the return of chronic restriction.
Expected timeline for results. Subjective release is often noticeable within the first two or three sessions. Meaningful reductions in low back tension and improvements in hip mobility generally appear within two to three weeks of consistent practice. Postural changes and deeper structural release develop over two to three months.
“The pattern I have seen with hundreds of retreat guests and coaching clients is that the 5-day program produces enough felt change by day three or four that the practice starts to earn its own place in the daily routine. The women who follow through beyond the first week almost always continue for months and years because the felt benefit of a released psoas is so distinct and so different from what most midlife women have been carrying without realizing it. The chronic bracing pattern of a shortened psoas is invisible until you release it. Once you release it, you cannot unfeel the difference. That felt-sense change is what makes the practice sustainable in a way that most fitness programs are not.”
Terry Tateossian, Founder of The House of Rose
Which Mistakes Can Undermine Psoas Release?
Six mistakes consistently reduce the effectiveness of psoas release practice for midlife women.
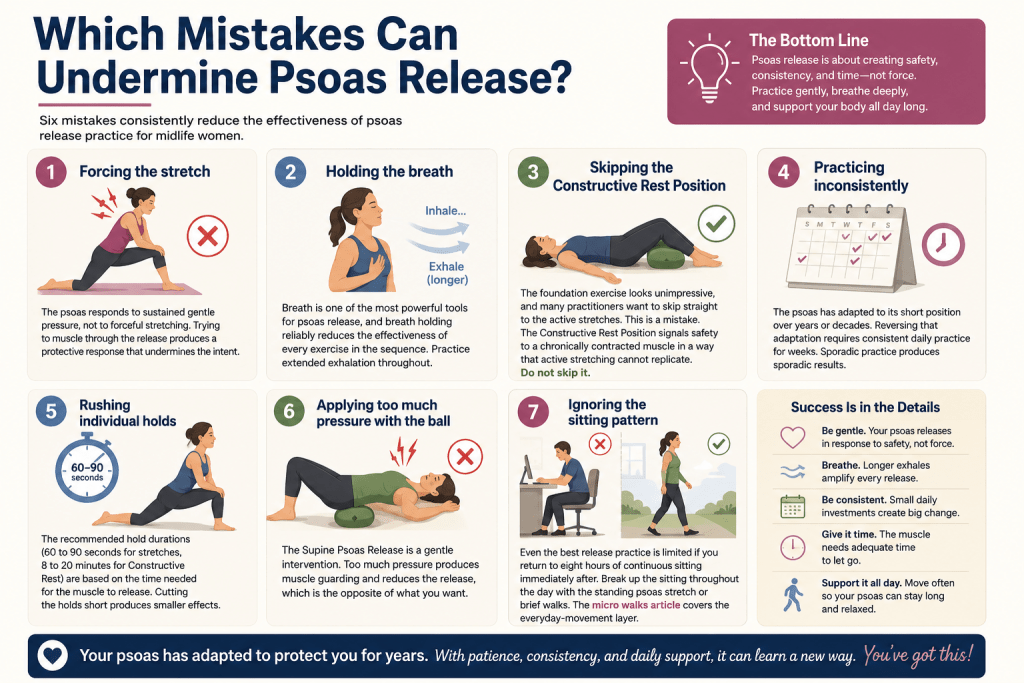
- Forcing the stretch: The psoas responds to sustained gentle pressure, not to forceful stretching. Trying to muscle through the release produces a protective response that undermines the intent.
- Holding the breath: Breath is one of the most powerful tools for psoas release, and breath holding reliably reduces the effectiveness of every exercise in the sequence. Practice extended exhalation throughout.
- Skipping the Constructive Rest Position: The foundation exercise looks unimpressive, and many practitioners want to skip straight to the active stretches. This is a mistake. The Constructive Rest Position signals safety to a chronically contracted muscle in a way that active stretching cannot replicate. Do not skip it.
- Practicing inconsistently: The psoas has adapted to its short position over years or decades. Reversing that adaptation requires consistent daily practice for weeks. Sporadic practice produces sporadic results.
- Rushing individual holds: The recommended hold durations (60 to 90 seconds for stretches, 8 to 20 minutes for Constructive Rest) are based on the time needed for the muscle to release. Cutting the holds short produces smaller effects.
- Applying too much pressure with the ball: The Supine Psoas Release is a gentle intervention. Too much pressure produces muscle guarding and reduces the release, which is the opposite of what you want.
- Ignoring the sitting pattern: Even the best release practice is limited if you return to eight hours of continuous sitting immediately after. Break up the sitting throughout the day with the standing psoas stretch or brief walks. The micro walks article covers the everyday-movement layer.
How Does Psoas Release Fit the THOR Framework?
Psoas release is one component of the broader movement and lifestyle medicine framework I teach at THOR. It amplifies and is amplified by the rest of the system.
- Nutrition foundation: Adequate hydration and appropriate mineral intake support connective tissue health and muscle recovery. The free Macro Calculator gives you a personalized nutrition starting point. The Macro Miracle Mediterranean Cookbook is the kitchen-side companion.
- Movement layer: Psoas release works alongside resistance training (covered in our four muscle groups article), everyday walking (covered in our micro walks article), and complementary myofascial work (covered in our five yin yoga poses article and our fascia lymphatic connection article).
- Sleep and recovery: The nightly repair that consolidates the daily psoas release work happens during sleep. The menopause sleep remedies article covers the sleep framework.
- Nervous system regulation: The connection between the psoas and the sympathetic nervous system means that vagus nerve reset practices amplify psoas release work. The vagus nerve reset exercises article covers this side.
Free 28-Day Fascia Reset Email Course
Get our Free 28-day email course series to help with 1 or 2 exercises per day to release your fascia. One short lesson per day. Two minutes to read each.
When Should You See a Healthcare Professional?
Most midlife women can safely complete the 5-day program on their own. Some situations require professional evaluation first.
- Acute low back pain: Any acute or severe back pain should be evaluated by a healthcare provider before starting a new movement program.
- Radiating pain down the leg: Radiating pain, numbness, or tingling suggests possible nerve involvement and needs evaluation before starting movement work.
- History of significant back or hip surgery: Prior spinal fusion, hip replacement, or other significant surgery may require modification.
- Pregnancy: Some of the exercises need modification during pregnancy. Skip the ball release entirely. Work with a prenatal-certified practitioner for individualized guidance.
- Pelvic organ prolapse: Anyone with prolapse should work with a pelvic floor physical therapist before beginning targeted psoas work.
- Hernia: Skip the Supine Psoas Release with Ball. The other exercises are generally safe but should be discussed with your provider.
- Abdominal aortic issues: Do not do the Supine Psoas Release with Ball. Discuss the other exercises with your provider.
- Persistent tightness despite practice: If eight to twelve weeks of consistent practice has not produced meaningful improvement, consider working with a physical therapist or manual therapist for individualized assessment and treatment.
What Are Your Next Steps?
If the framework in this article resonates and you want to release chronic psoas tension, here are the four next steps in order of friction.
- Start today with Day 1 of the program. All you need is a comfortable surface, about fifteen minutes, and a willingness to lie down in Constructive Rest Position with deep breathing. No equipment, no preparation, no perfect conditions required.
- Complete the full 5-day program this week. Follow the daily protocols in section 11. Track how your body feels each day.
- Continue with the maintenance practice. After day five, keep the daily 10 to 15 minute maintenance practice going. Repeat the full Day 5 sequence once a week.
Free 28-Day Fascia Reset Email Course
Get our Free 28-day email course series to help with 1 or 2 exercises per day to release your fascia. One short lesson per day. Two minutes to read each.
Frequently Asked Questions
What causes a tight psoas in women over 40?
Tight psoas in women over 40 is driven by decades of prolonged sitting, chronic stress and cortisol elevation, hormonal changes in fascia and connective tissue, sleep disruption that prevents nightly repair, pelvic floor changes, reduced overall movement, and often a history of traditional core work that overtrained the psoas. Most midlife women experience multiple of these factors simultaneously.
How do I know if my psoas is tight?
Common signs include chronic low back pain particularly in the lumbar area, deep hip tension that does not resolve with standard hip stretches, an anterior pelvic tilt (arched lower back when standing), tightness in the front of the hip when climbing stairs, restricted breath depth on the inhale, and difficulty fully extending the hip behind the body. The modified Thomas test (lying on your back with both legs straight and observing whether the lower back can rest flat) is a simple self-screen.
How long does it take to release a tight psoas?
Subjective release is often noticeable within the first two or three sessions. Meaningful reductions in low back tension and improvements in hip mobility generally appear within two to three weeks of consistent daily practice. Postural changes and deeper structural release develop over two to three months. The 5-day program in this article produces meaningful initial change within one week.
Can I release my psoas without a ball or equipment?
Yes, the first three exercises in this article (Constructive Rest Position, Half-Kneeling Hip Flexor Stretch, Low Lunge with Side Bend) require no equipment other than a comfortable surface. Together these three produce significant psoas release. The ball release adds a targeted layer, but it is not essential for meaningful progress.
Is psoas release safe during pregnancy?
Some psoas exercises need modification during pregnancy, and one exercise should be skipped entirely. Skip the Supine Psoas Release with Ball entirely. The Constructive Rest Position, Half-Kneeling Hip Flexor Stretch, and Standing Psoas Stretch are generally safe with modification. Work with a prenatal-certified practitioner or physical therapist for individualized guidance.
Can tight psoas cause low back pain?
Yes, tight psoas is one of the most common invisible contributors to chronic low back pain in midlife women. When the psoas is short, it pulls the lumbar spine forward and creates an exaggerated arch that can produce chronic tension and pain in the low back. Releasing the psoas often resolves back pain that has not responded to other interventions.
Should I stretch my psoas every day?
Yes, daily practice is significantly more effective than occasional longer sessions because the psoas has adapted to its short position over years, and reversing that adaptation requires consistent daily signaling. Ten to fifteen minutes of daily practice produces better results than an hour once a week.
What is the best time of day to release the psoas?
Any time of day works. Morning practice supports posture and mobility throughout the day. Evening practice supports sleep by releasing accumulated tension. Middle-of-the-day practice interrupts the sitting-driven shortening pattern in real time. Choose the time that produces the highest adherence for you.
Free 28-Day Fascia Reset Email Course
Get our Free 28-day email course series to help with 1 or 2 exercises per day to release your fascia. One short lesson per day. Two minutes to read each.
Does yoga help with tight psoas?
Yes, yoga includes many postures that specifically address the psoas, including low lunge (Anjaneyasana), lizard pose, camel pose, and bridge pose. A dedicated yin yoga or restorative yoga practice is particularly effective. The five yin yoga poses article covers a specific home practice sequence. The retreat at our Smoky Mountains property includes daily yoga programming specifically for this purpose.
Can tight psoas affect breathing?
Yes, the psoas shares fascial connections with the diaphragm, and a tight psoas can restrict the depth of the inhale. Many women notice that their breath becomes deeper and easier after consistent psoas release practice. This bidirectional connection is why combined breath-and-movement approaches produce better results than pure stretching.
Is the ball release safe for everyone?
No, the Supine Psoas Release with Ball should be skipped by anyone who is pregnant, has a hernia, has had recent abdominal surgery, has a known abdominal aortic aneurysm, has active abdominal pain, or has any acute abdominal concern. When in doubt, skip this exercise and rely on the other four.
Can psoas tightness cause hip pain?
Yes, tight psoas can produce deep hip tension, restricted hip range of motion, and discomfort or pinching in the front of the hip during activities like squatting or climbing stairs. Releasing the psoas often resolves hip tension that had been attributed to other causes.
What if I only have five minutes?
If you only have five minutes, do the Constructive Rest Position with deep breathing. This is the single highest-impact exercise per minute in the sequence and produces meaningful release even in short sessions. Any minute spent in this position is a minute the psoas has to release.
Can psoas release help with digestion?
Some women report improvements in digestion after consistent psoas release practice. The mechanism is likely related to the reduction of chronic tension in the abdominal region and possibly to improvements in vagal tone through the sympathetic-nervous-system connection with the psoas. This is anecdotal rather than well-studied, but the reports are consistent enough to be worth noting.
Should I combine psoas release with strength training?
Yes, and the combination is more effective than either alone. Psoas release addresses the restriction. Strength training addresses the strength and stability of the muscles that support the pelvis and spine. Together they produce better and more sustainable results than either alone. The four muscle groups for aging well article and the standing ab exercises article cover the strength training pieces that complement psoas release.
References
- Sajko, S., & Stuber, K. (2009). Psoas major: a case report and review of its anatomy, biomechanics, and clinical implications. Journal of the Canadian Chiropractic Association, 53(4), 311–318.
- Bordoni, B., & Varacallo, M. (2023). Anatomy, abdomen and pelvis: iliopsoas muscle. StatPearls, StatPearls Publishing.
- Konrad, A., Močnik, R., & Titze, S. (2019). The influence of stretching on the position of the pelvis and the trunk. International Journal of Environmental Research and Public Health, 16(21), 4266.
- Hu, H., Meijer, O. G., van Dieën, J. H., et al. (2011). Understanding the active straight leg raise: an electromyographic study of pelvic and lower limb muscle recruitment patterns. Manual Therapy, 16(4), 401–406.
- Kim, D. H., Kim, C. J., & Son, S. M. (2018). Neck pain in adults with forward head posture: effects of craniovertebral angle and cervical range of motion. Osong Public Health and Research Perspectives, 9(6), 309–313.
- Nourbakhsh, M. R., & Arab, A. M. (2002). Relationship between mechanical factors and incidence of low back pain. Journal of Orthopaedic and Sports Physical Therapy, 32(9), 447–460.
- Mills, M., Frank, B., Goto, S., et al. (2015). Effect of restricted hip flexor muscle length on hip extensor muscle activity and lower extremity biomechanics in college-aged female soccer players. International Journal of Sports Physical Therapy, 10(7), 946–954.
- Winters, M. V., Blake, C. G., Trost, J. S., et al. (2004). Passive versus active stretching of hip flexor muscles in subjects with limited hip extension: a randomized clinical trial. Physical Therapy, 84(9), 800–807.
- Kim, K., & Yoo, W. G. (2015). The effects of self-myofascial release exercise on the muscle activity of tibialis anterior. Journal of Physical Therapy Science, 27(9), 2933–2934.
- Beardsley, C., & Škarabot, J. (2015). Effects of self-myofascial release: a systematic review. Journal of Bodywork and Movement Therapies, 19(4), 747–758.
- Behm, D. G., & Wilke, J. (2019). Do self-myofascial release devices release myofascia? Rolling mechanisms: a narrative review. Sports Medicine, 49(8), 1173–1181.
- Streeter, C. C., Gerbarg, P. L., Saper, R. B., et al. (2012). Effects of yoga on the autonomic nervous system, gamma-aminobutyric-acid, and allostasis in epilepsy, depression, and post-traumatic stress disorder. Medical Hypotheses, 78(5), 571–579.
- Bordoni, B., & Zanier, E. (2013). Anatomic connections of the diaphragm: influence of respiration on the body system. Journal of Multidisciplinary Healthcare, 6, 281–291.
- Vleeming, A., Schuenke, M. D., Danneels, L., & Willard, F. H. (2014). The functional coupling of the deep abdominal and paraspinal muscles: the effects of simulated paraspinal muscle contraction on force transfer to the middle and posterior layer of the thoracolumbar fascia. Journal of Anatomy, 225(4), 447–462.
- Falla, D., & Hodges, P. W. (2017). Individualized exercise interventions for spinal pain. Exercise and Sport Sciences Reviews, 45(2), 105–115.
- Woolery, A., Myers, H., Sternlieb, B., & Zeltzer, L. (2004). A yoga intervention for young adults with elevated symptoms of depression. Alternative Therapies in Health and Medicine, 10(2), 60–63.
- Sherman, K. J., Cherkin, D. C., Wellman, R. D., et al. (2011). A randomized trial comparing yoga, stretching, and a self-care book for chronic low back pain. Archives of Internal Medicine, 171(22), 2019–2026.
- Chang, D. G., Holt, J. A., Sklar, M., & Groessl, E. J. (2016). Yoga as a treatment for chronic low back pain: a systematic review of the literature. Journal of Orthopedics and Rheumatology, 3(1), 1–8.
Disclaimer: Always consult with a healthcare professional before starting any new routines, programs, or nutrition plans to ensure you receive the best medical advice and strategy for your specific individual needs.
Free 28-Day Fascia Reset Email Course
Get our Free 28-day email course series to help with 1 or 2 exercises per day to release your fascia. One short lesson per day. Two minutes to read each.

Terry Tateossian is a Menopause Lifestyle Medicine Coach, Certified Personal Trainer & Nutritionist and the Founder of THOR: The House of Rose, a wellness brand serving women over 40 through retreats, coaching, macro-nutrition and community. As 25-year founder and entrepreneur, Terry spent two and a half decades building and running successful start-up businesses, an experience that put her on the front line of founder burnout long before she could name it. After facing serious health challenges, early onset menopause, and emotional eating while running her agency and raising two children, Terry rebuilt her health in her 40s and lost more than 80 pounds through evidence-based nutrition, training, and mindset work. Today, she helps women get strong, improve confidence, support hormone health, and create a stronger second half of life. Terry has been featured in major media outlets and is available for podcasts, expert commentary, brand collaborations, and speaking engagements on midlife health, reinvention, emotional eating, menopause wellness, and strength training for longevity. Get her free macro calculator (her cookbook companion) to start your journey to back to health.